How To Normalize Audio In Davinci Resolve 18
Normalizing audio volume is often necessary when composing your video from multiple sources. Or simply because you spoke too loud in one part of your audio track by mistake. If that's the case, no problem. You can normalize your entire audio track volume by using built in audio normalization feature in Davinci Resolve 18. If it doesn't work, you can still do it manually by cutting around loud part with the Razor Blade tool, and adjusting volume for that clip manually.
First, let's watch the video, it's probably the fastest way to learn:
How to Normalize Audio in DaVinci Resolve 18: A Step By Step Guide
In this article, we'll guide you on how to normalize audio in DaVinci Resolve 18, a popular video editing software. This tutorial is particularly useful if you are dealing with an audio track that has both quiet and loud parts.
But what if you wish to balance these fluctuations, or if you are editing a film or video where the audio levels need to be consistent throughout? Averaging down the volume relative to the rest of the audio volume in the track can be done by using the built-in Normalize Audio Levels tool in Davinci Resolve.
To normalize audio, follow these steps:
- Right-click on audio clip and select 'Normalize Audio Levels'.
- From drop-down menu that appears, select 'Sample Peak Program'.
- Optionally adjust decibel level which is -9.0 by default.
- Click 'Normalize' to apply the changes to your audio track.
- If the built-in feature doesn't give you the desired results, select the Razor Blade tool and adjust the volume manually.
- Drag the midline of the audio track down to the average level to normalize the volume.
Normalization is a useful tool for any video editor, as it automatically adjusts the volume of your audio tracks to a standard level, making your final product sound more professional and consistent.
Let's get started on how to normalize audio levels in DaVinci Resolve 18.
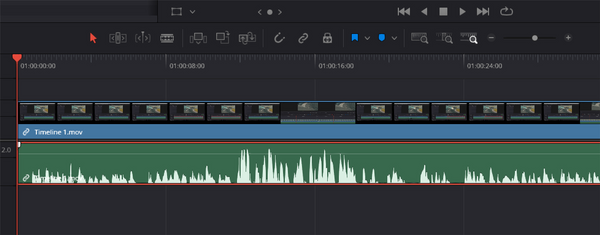
Using The Built-In Normalize Audio Levels Feature
DaVinci Resolve 18 has a built-in feature for normalizing audio. To use this feature, follow these steps:
1. Right-click on the audio clip that you want to normalize.
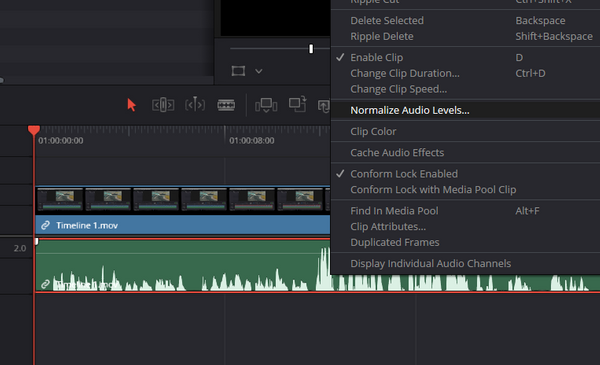
2. From the options that appear, select 'Normalize Audio Levels'.
3. In the drop-down menu that appears, select the first option 'Sample Peak Program'. You may also have the options 'Independent' and 'Relative' available to you, depending on your version of DaVinci Resolve 18. If these options are available, you can experiment with them to see which one gives you the best results.
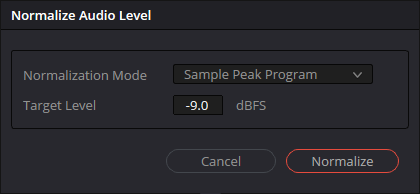
4. After you have selected your preferred settings, click 'Normalize' to apply the changes to your audio track.
Alternative Method: Using The Razor Blade Tool
If the built-in feature doesn't give you the desired results, or you want to have more control over the normalization process, you can use the Razor Blade tool and adjust the volume of the clip manually. Here's how:
1. Select the Razor Blade tool from the toolbar.
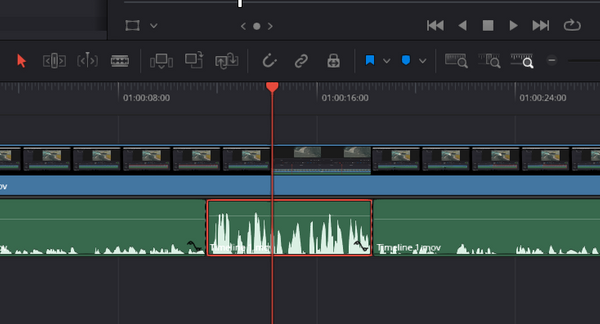
2. Using the Razor Blade tool, cut the part of the audio that's louder than the other parts.
3. Drag the midline of the cut section down to the average level of the entire audio track.
And there you have it! You have now learned how to normalize audio in DaVinci Resolve 18 using two different methods. Remember, normalization is a crucial step in video editing that can greatly improve the quality of your final product.
Articles Related To Davinciresolve Community
- How To Download, Install And Activate Davinci Resolve Studio 18 on 10 Dec 2023 by Ghost Together
- How to use LUTs in Davinci Resolve 18 on 10 Dec 2023 by Ghost Together
- How To Zoom On Video In Davinci Resolve on 10 Dec 2023 by Ghost Together
- How To Flip VIdeo In Davinci Resolve 18 on 10 Dec 2023 by Ghost Together
- How To Cut Audio In Davinci Resolve 18 on 9 Dec 2023 by Ghost Together
- How To Cut or Trim Video In Davinci Resolve 18 on 9 Dec 2023 by Ghost Together
- How To Crop And Zoom Video In Davinci Resolve 18 on 10 Dec 2023 by Ghost Together
- How To Zoom In & Out On Timeline In Davinci Resolve 18 on 8 Dec 2023 by Ghost Together
- How To Remove Sound From Video Track on 26 Sep 2023 by Ghost Together
- DaVinci Resolve 18 Green Screen Effect Tutorial on 25 Sep 2023 by Ghost Together
Last 10 Articles Written On Ghost Together
- How to use ChatGPT 5 for free? on 10 Aug 2025
- The dead audience dilemma on 16 Jul 2025 by Dean Tarisai
- xv on 24 Jun 2024 by AndrewOcean
- How to get started on 17 Dec 2023 by Kenya
- How To Make Characters In Midjourney on 14 Dec 2023 by Ghost Together
- How to make money online on 12 Dec 2023 by DRSMS313
- How To Make Consistent Characters In Midjourney on 12 Dec 2023 by Ghost Together
- Wildfires and Wastelands on 10 Dec 2023 by A. Stranger
- How To Download, Install And Activate Davinci Resolve Studio 18 on 10 Dec 2023 by Ghost Together
- How to use LUTs in Davinci Resolve 18 on 10 Dec 2023 by Ghost Together
Last 10 Davinciresolve Questions Asked On Ghost Overflow
- Ask your first Davinciresolve question! (Help us build the largest database of questions on any subject)

