DaVinci Resolve 18: How to Blur Part of a Video Clip & Make It Follow Moving Object
How to add blur to part of a video clip and make it follow a face?
You can use the same step by step instructions in this tutorial to simply blur out an area on part of your video, without moving it, just skip the Tracker part. Or follow second set of instructions below.
1. How to Blur Part of a Video Clip:
To add blur to part of your clip:
- Navigate to Color tab.
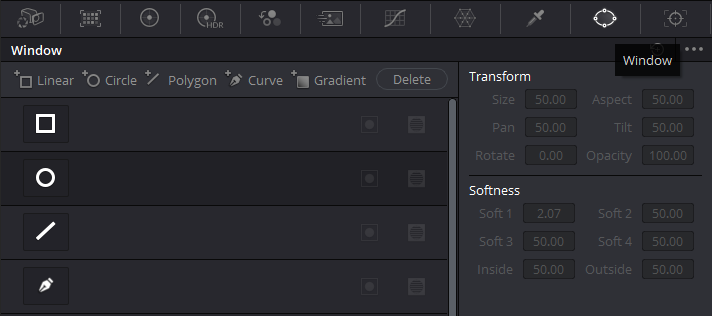
- Select Window button on Color view navbar.
- Position playhead on frame where you want the blur effect to start.
- Click on either Rectangle, Circle, Polygon or Gradient shape to add shape to the video clip.
- Move the shape and adjust its corners to fit around the object.
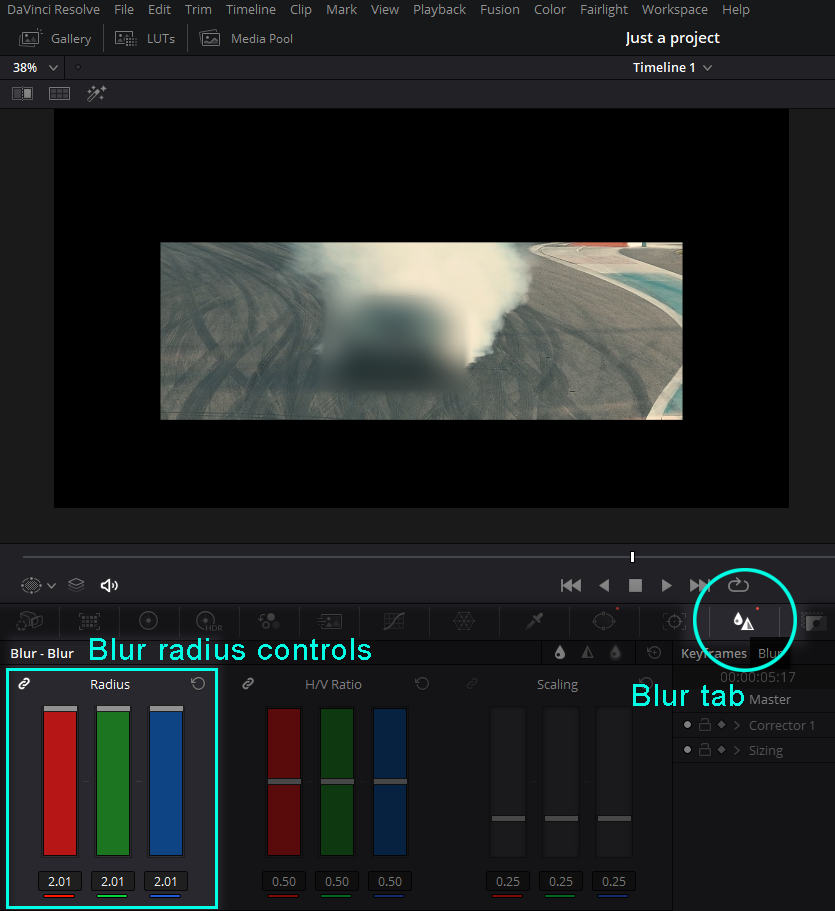
- Go to Blur tab and slide blur radius controls up [the red, green and blue lines].
Everything under the ploygonal area will be rendered with blur effect applied.
Now if you want it to follow a dynamic object, you can use Tracker as explained in the next section.
It's exactly the same workflow, but with one extra step.
2. How to Make Blur Follow a Moving Object:
To make your blur follow a moving object in your video:
- Navigate to Color tab.
- Select Window button on Color view navbar.
- Position playhead on frame where you want the blur effect to start.
- Click on either Rectangle, Circle, Polygon or Gradient shape to add shape to the video clip.
- Move the shape and adjust its corners to fit around the object.
- Go to Blur tab and slide blur radius controls up [the red, green and blue lines].
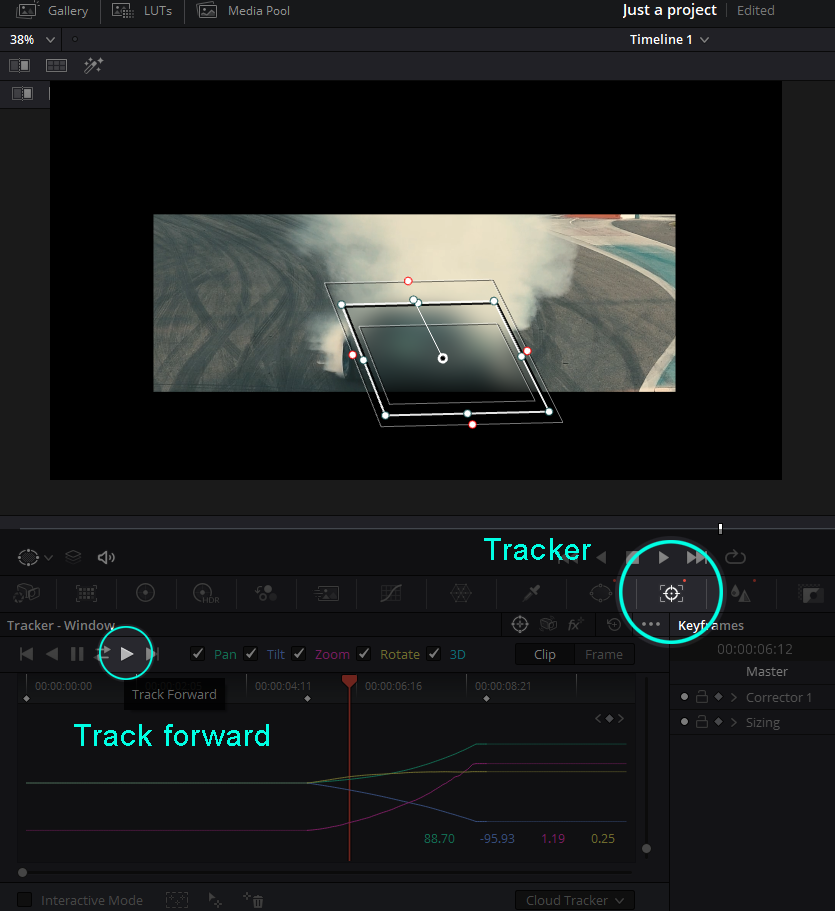
- Go to Tracker tab and press Track Forward button [looks like play button].
- Wait for DaVinci Resolve to trace your object.
- Play the video, blur should follow your moving object.
Here's a quick video explaining how to make blur follow a moving object:
YouTube Video: How to make blur follow moving object in DaVinci Resolve
Covering part of a video with a blur can be useful for hiding details like a person's face, license plate on a moving car, logos or copyrighted material. It comes as no surprise that blur effect has always been a popular tool in the world of video editing.
It all starts with the Color tab.
If you want to overlay a blurry area over part of a video clip in DaVinci Resolve first thing you want to do is head over to the Color tab in the bottom navigation bar.
Click on the Color button on the navigation bar to open Color edit mode:

On the Color view, click Window button on the subnavigation bar:

Choose your blur mask's shape (rectangle, circle, pen, free custom polygon shape, gradient.)
Here you can choose between different shapes for your blur mask. The circle and rectangle seem to be the obvious choices for most tasks.
Placing the shape onto the view to cover part of the video
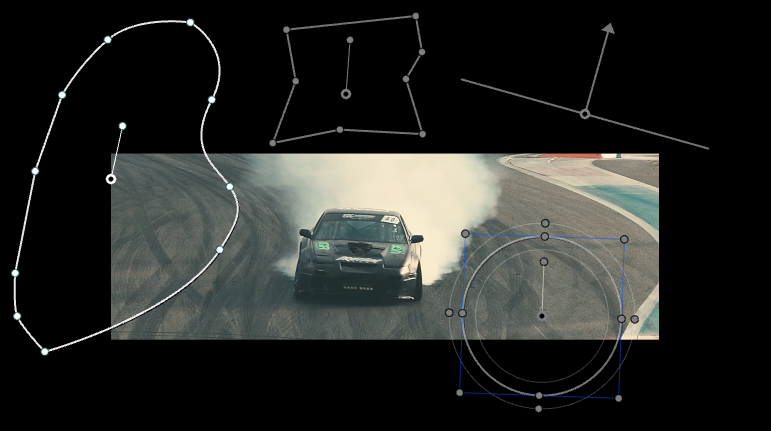
Clicking on the shape causes it to appear in the center of your video. From here on, you can further modify its appearance by dragging controllers around its edges, or rotate it by anchor point's vector.
Here are examples of some of the shapes (note, they can be used for a variety of other effects, not just adding blur to part of your video):

Shapes can be additionally modified by clicking and dragging either the corners of the shape, or by clicking in the middle of its side, to additionally split it at that point.
Note that Resolve limits you to one shape of its kind. Clicking on same shape on the list again will not add second shape of that type. It will toggle it on and off. However, the 5 shapes that can simultaneously appear on the same screen are more than enough to achieve any masking effect.
Adding blur around specific part of the video
Finally, go to Blur tab:

Drag the vertical bar up, on one of the blur radius controls. (On one of the 3 vertical red, green and blue stripes.)
The blur controls are not limited by their size. You can continue dragging the value all the way up, past the top of the stripes and your blur effect will continue to increase to its maximum value.
How to make blur follow a moving object?
Go to Track tab.
Here you can make DaVinci Resolve track the masked object automatically for you. All you have to do is press the "play" (Track Forward) button in separate "track moving object" player controls, as shown in the screenshot example below:

Before pressing Track Forward button it's important that your selection is as snug as possible around the moving object. It doesn't have to be perfect but it does need to be very close to resembling the shape of the object (or your blur effect might not track the object as you intend it to.)
You can adjust the custom rectangle to by moving its corners around the object.
Wait for the video to finish playing and for the tracker to map your area around the moving object.
How to make the blur to perfectly follow the moving object?
Precision of the algorithm depends on whether the moving object changes shape in future frames. If it does, you might want to skip Tracker, just play the movie, and move the blur area (or adjust it) by hand.
If after tracking the blur area doesn't follow the moving object perfectly, you can drag the area around manually with the mouse, and davinci resolve will place keyframes automatically.
Other Davinci Resolve 18 tutorials: How To Merge Video Clips In DaVinci Resolve 17 or 18 DaVinci Resolve 18: How To Increase Brightness (Video Clip) How To Fade Out Video or Audio In DaVinci Resolve 18 (Quick Tutorial) DaVinci Resolve 18 How To Increase Video Clip Speed How To Download, Install & Activate Davinci Resolve Studio 18 or 18.5 (Upgrade From Free Version) How To Activate Davinci Resolve Studio 18 or 18.5 How To Move All Video Clips To The Right In DaVinci Resolve 18 (Quick Tutorial) How To Flip Video Clip Vertically and Horizontally in DaVinci Resolve 17 18 (How To Mirror Clip) How To Gradually Increase Video Clip Speed On A Curve In DaVinci Resolve 18 How To Fade Out Video In DaVinci Resolve 18 (Fade To Black Effect) How To Remove Watermark In Davinci Resolve 18 (Object Removal Tutorial) How To Speed Up Audio Track In DaVinci Resolve 18 (quick tutorial) How To Fade Audio In / Out In DaVinci Resolve (Gradually Change Volume Dynamically On A Curve) How To Crossfade Video In DaVinci Resolve 18 (2 different ways!) How To Split Video Clips In DaVinci Resolve 18 How To Fade In Video Clip In DaVinci Resolve 18 (Fade In From Black) How To Show, Transform and Move Anchor Point In DaVinci Resolve (It's off by default!) How To Crossfade Audio In DaVinci Resolve 18 How To Change Aspect Ratio In Davinci Resolve 18 To HD Square, Vertical Or 9:16 (Mobile) How To Add Watermark In DaVinci Resolve 18 (quick tutorial) How to Change Aspect Ratio in Davinci Resolve 18 Square And Portrait Mode Tutorial How To Increase Speed of a Video Clip Segment In DaVinci Resolve 18 Davinci Resolve 18 Waveform Is Not Showing Up On Audio Track (Quick Fix) How To Change Aspect Ratio In Davinci Resolve | Change Video Resolution Tutorial How To Use Green Screen In DaVinci Resolve 18 (Fastest Tutorial) How To Change Resolution In Davinci Resolve 18 To Vertical 9:16 Adjust Volume In Davinci Resolve 18 How To Track An Object In Davinci Resolve 18 (Quick Tutorial) DaVinci Resolve Rewind Effect (play video backwards) Davinci Resolve 18 Tutorial For Beginners 2024 How To Fix Waveform Not Showing Up In Davinci Resolve 18 How To Add Automatic Subtitles In Davinci Resolve 18 (Convert Audio To Text) How To Separate Audio Track From Video Track In DaVinci Resolve 18 How To Add Subtitles In Davinci Resolve 18 (Transcribe Closed Captions From Audio) Davinci Resolve 18 Dynamic Zoom Tutorial How To Track Object In Davinci Resolve 18 In 2 Minutes How To Open Project Settings In Davinci Resolve 18 How To Remove Green Screen In Davinci Resolve 18 or 18.5 DaVinci Resolve How To Zoom Out Davinci Resolve 18 How To Zoom In and Zoom Out Using Dynamic Zoom How To Remove Sound From Video In Davinci Resolve 18 How To Remove Sound From Video In Davinci Resolve 18 (Remove Music, Save Without Sound) DaVinci Resolve 18 - How To Zoom In And Out On Timeline (and resize track height) Complete Guide To Davinci Resolve 18 Timeline Zoom In and Out FeatureArticles Related To Davinciresolve Community
- How To Download, Install And Activate Davinci Resolve Studio 18 on 10 Dec 2023 by Ghost Together
- How to use LUTs in Davinci Resolve 18 on 10 Dec 2023 by Ghost Together
- How To Zoom On Video In Davinci Resolve on 10 Dec 2023 by Ghost Together
- How To Flip VIdeo In Davinci Resolve 18 on 10 Dec 2023 by Ghost Together
- How To Normalize Audio In Davinci Resolve 18 on 9 Dec 2023 by Ghost Together
- How To Cut Audio In Davinci Resolve 18 on 9 Dec 2023 by Ghost Together
- How To Cut or Trim Video In Davinci Resolve 18 on 9 Dec 2023 by Ghost Together
- How To Crop And Zoom Video In Davinci Resolve 18 on 10 Dec 2023 by Ghost Together
- How To Zoom In & Out On Timeline In Davinci Resolve 18 on 8 Dec 2023 by Ghost Together
- How To Remove Sound From Video Track on 26 Sep 2023 by Ghost Together
Last 10 Articles Written On Ghost Together
- How to use ChatGPT 5 for free? on 10 Aug 2025
- The dead audience dilemma on 16 Jul 2025 by Dean Tarisai
- xv on 24 Jun 2024 by AndrewOcean
- How to get started on 17 Dec 2023 by Kenya
- How To Make Characters In Midjourney on 14 Dec 2023 by Ghost Together
- How to make money online on 12 Dec 2023 by DRSMS313
- How To Make Consistent Characters In Midjourney on 12 Dec 2023 by Ghost Together
- Wildfires and Wastelands on 10 Dec 2023 by A. Stranger
- How To Download, Install And Activate Davinci Resolve Studio 18 on 10 Dec 2023 by Ghost Together
- How to use LUTs in Davinci Resolve 18 on 10 Dec 2023 by Ghost Together
Last 10 Davinciresolve Questions Asked On Ghost Overflow
- Ask your first Davinciresolve question! (Help us build the largest database of questions on any subject)

