The Complete CSS Grid Tutorial
Learn CSS Visually! Every single CSS property visualized in this pictorial CSS guide book!

⭐⭐⭐⭐ and 1/2⭐ - owned by over 27.1K readers.
Get this CSS book in PDF format, on Amazon or start reading this css book on your Kindle device today!
This tutorial is intended to be a bird's eye view of CSS grid features. It's best suited for someone who is just starting out with CSS grid but wants to know about the entire scope of features behind CSS grid explained in one tutorial.
You’re probably familiar with the box model for regular HTML elements.
Please watch this video to support our content network 🙂
Here’s bird’s eye view for the CSS Grid model:
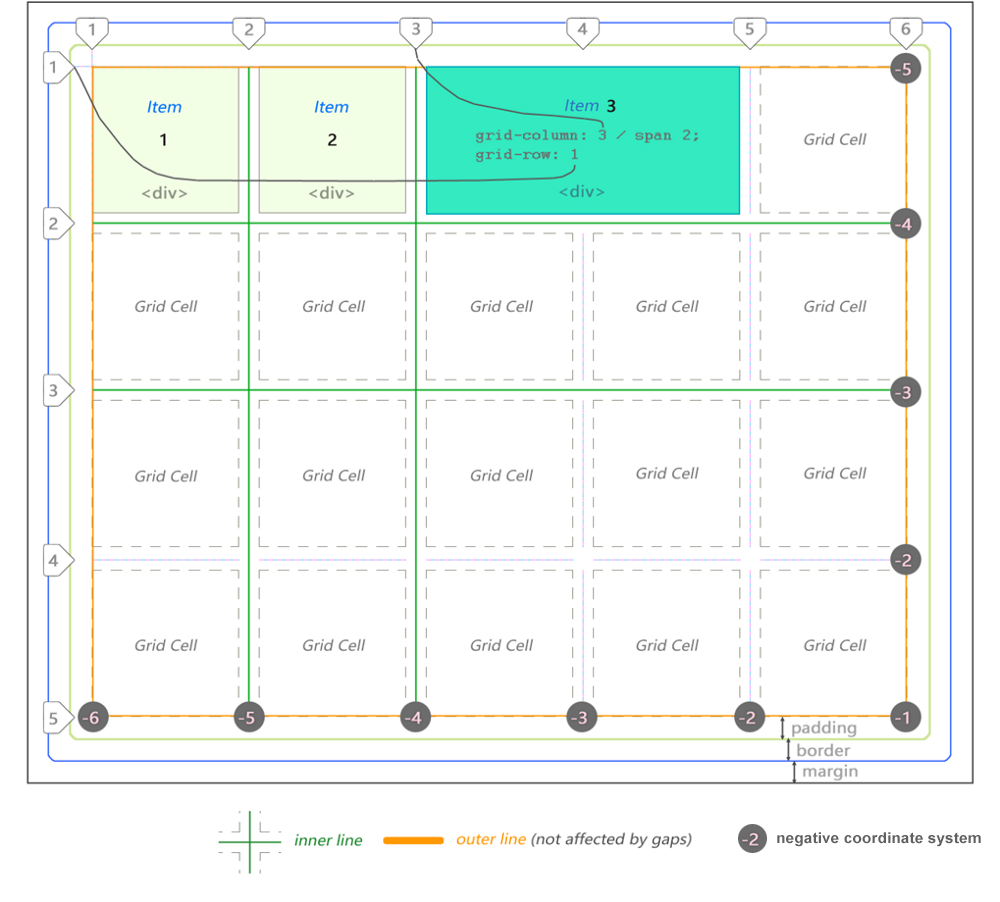
(CSS Grid Anatomy is composed of the primary container which can be just your
To make a parent CSS grid container out of any element use display: grid:
.grid {
    display: grid;
}
Then just apply it to your markup:
<main class = "grid">
    <section>1</section>
    <section>2</section>
    <section>3</section>
</main>
You can use <div> or any blocking element. Sometimes your grid element will be <main>, <article> or <section> or any of the elements from HTML5 set.
How Are CSS Grid Items Defined?
Grid’s items are simply the children elements nested inside the parent container.
They can often represent a header, sidebar, footer or similar layout components, depending on your application design.
Later in this tutorial when we get to Template Areas we'll see how multiple cells can represent those types of layout components.
Let's imitate the grid shown in the header screenshot above
- In this case there are 3 items defined by
element. - The third item will be stretched horizontally across 2 cells.
- (Note: We'll need additional CSS template code below to accomplish that.)
- Lines help you organize gaps. First line is line 1 (It's a non 0-index system.)
- Lines can be also counted backwards using negative coordinate system.
- (But you will rarely have to use them. Just know they exist.)
- The grid shown in above screenshot is 5 by 4 cells in dimension.
- It can be defined by following CSS code:
.grid {

    / This is our CSS grid parent container /
    display: grid;

    / 5 cols (each 100px in width) /
    grid-template-columns: 100px 100px 100px 100px 100px;

    / 4 rows (each 100px in height) /
    grid-template-rows:    100px 100px 100px 100px;
}
- Use grid-template-columns to define number and width of columns.
- Use grid-template-rows to define number and height of rows.
- Number of rows and columns is assumed implicitly by number of children present. The grid template layout definition is only a placeholder for items. If no children are present, no cells will be created (even if the column/row templates are defined.)
- In between each cell there is a line and an optional gap.
- Rows and columns between the lines are referred to as grid’s tracks.
- There are always [cell + 1] lines per dimension.
- Therefore 5 columns will have 6 lines whereas 4 rows will have 5 lines.
- In the following example there are 7 columns and only 1 row:
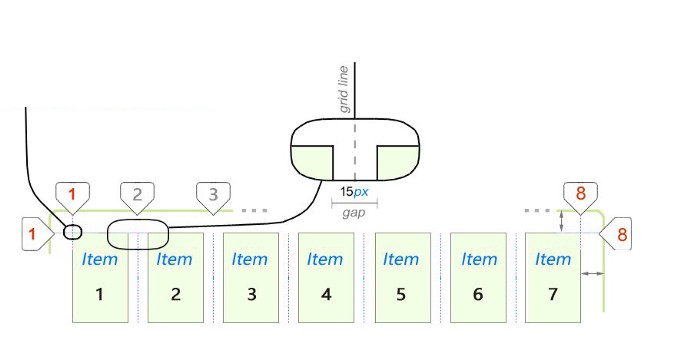
By default CSS grid doesn't have a border
So lines 1 down and 1 across start at the
upper left corner of first item
They are unaffected by gap width.
The CSS grid line is exactly
in the middle of the gap.
Even when padding is added
the first  and last
  lines are
not affected by gap size.
(Some of the first things you will notice about the CSS grid behavior.)
The first important thing you will notice about CSS grid is that outer lines are not affected by gap size. Only inner lines. We will take a deeper dive into this a bit later in this tutorial when we look at fractional (fr) units.
The CSS grid is bi-directional. Its items can flow either horizontally (column) or vertically (row). Set the value with grid-auto-flow property.
It works kind of like Flex:

Using grid-auto-flow: row or grid-auto-flow: column to determine flow direction of the grid’s items.
Think about the grid in this abstract way:
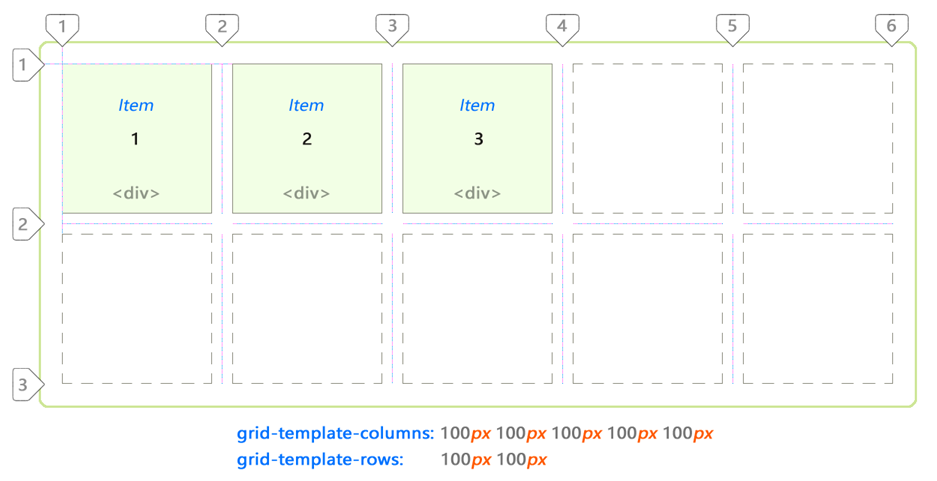
Okay — so we got the basic idea of how it works.
The creative part comes in when you are faced with the problem of actually juggling the item placements to create a sensible application layout. CSS Grid offers several properties to accomplish just that. We’ll take a look at them in the next section in this tutorial in just a moment.
Let’s cement our knowledge so far by looking at these examples:

I only used two elements for the items. Hence, the grid above.
Implicit and Explicit Content Placement
But what happens if we add one more item to the list?
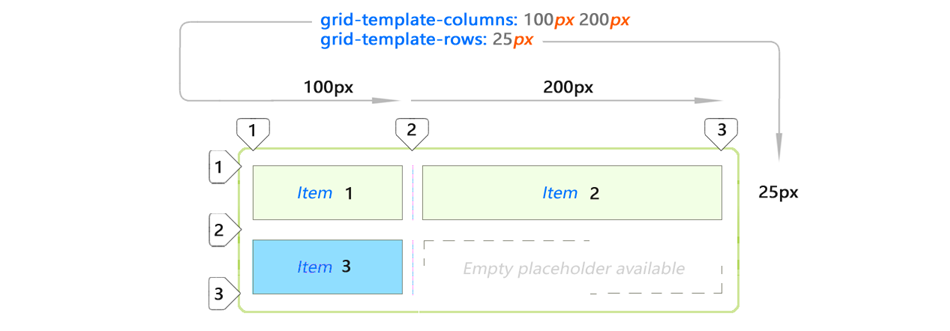
Adding item 3 to the same layout will automatically extend it (blue item.)
This new spacing is created automatically by copying values from first row.
Let’s add Item 4 shall we?
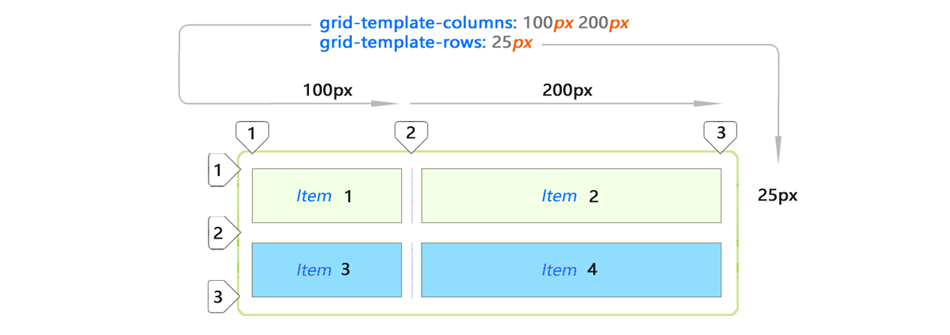
And again our CSS grid has made a decision to stretch Item 4 across the remaining space on second row.
This is because grid-template-rows specified enough space only for 1 row. The rest are automatic.
Placement of blue items is not explicitly specified by you. This is implicit (automatic) placement. They kind of just fall into that space.
Explicit Content Placement
This is just what you would expect from grid cells if you set custom values for all items on the list:
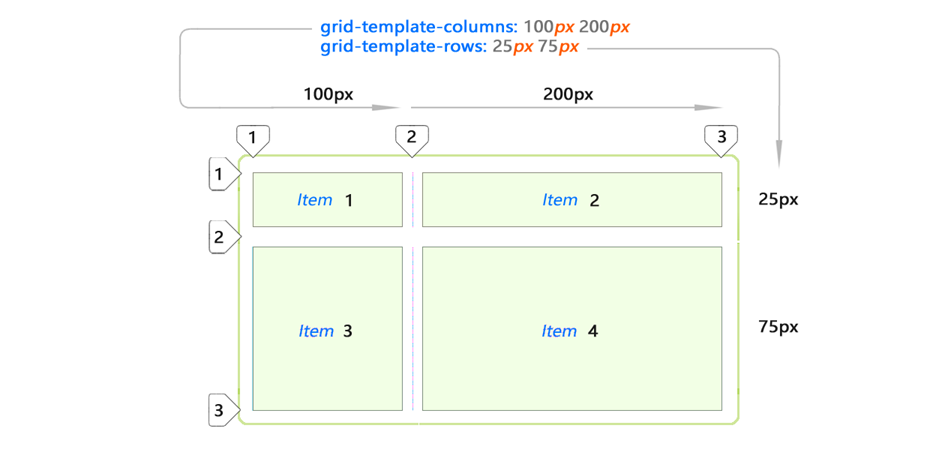
Basically you can gain control over the space on all consecutive rows by adding more values to grid-template-rows property. Notice the items are no longer implicit here. You defined them to be exact. (25px 75px)
Automatic Spacing
CSS grid offers a few properties to automatically stretch its cells across variable / unknown amount of space. Here are the key examples for both column and row auto flow cases:
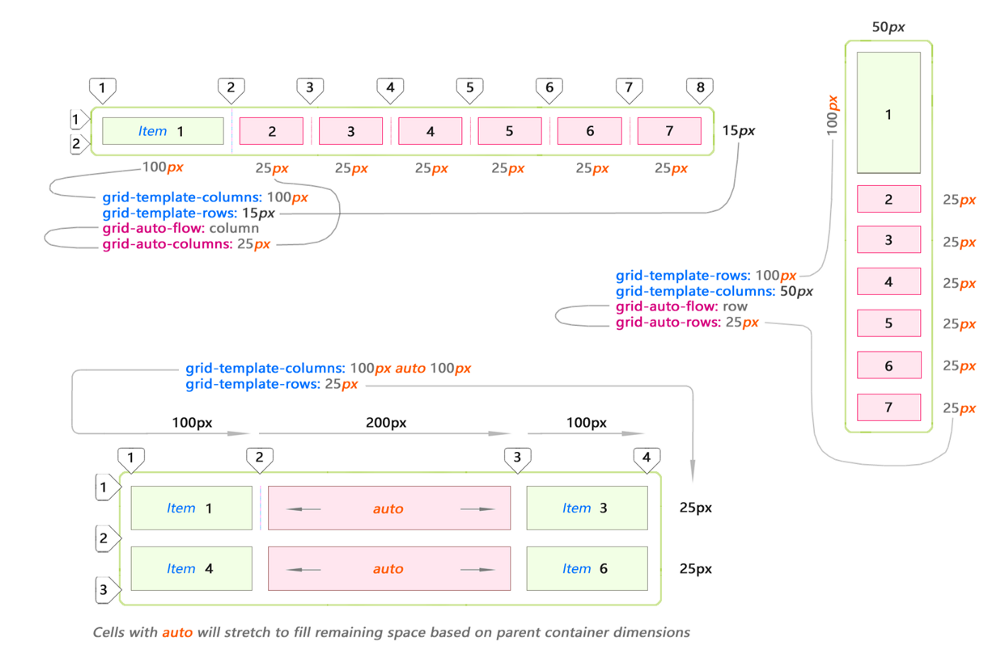
The bottom example demonstrates the usage of auto keyword. This just means that cell will stretch to fill up however much space is left in parent container after it has already been populated by explicitly placed items.
CSS Grid Gaps
Talking about CSS grid you can’t escape talking about gaps. Gaps are the horizontal and vertical spaces between grid cells.
Gaps are controlled using grid-column-gap and grid-row-gap properties:
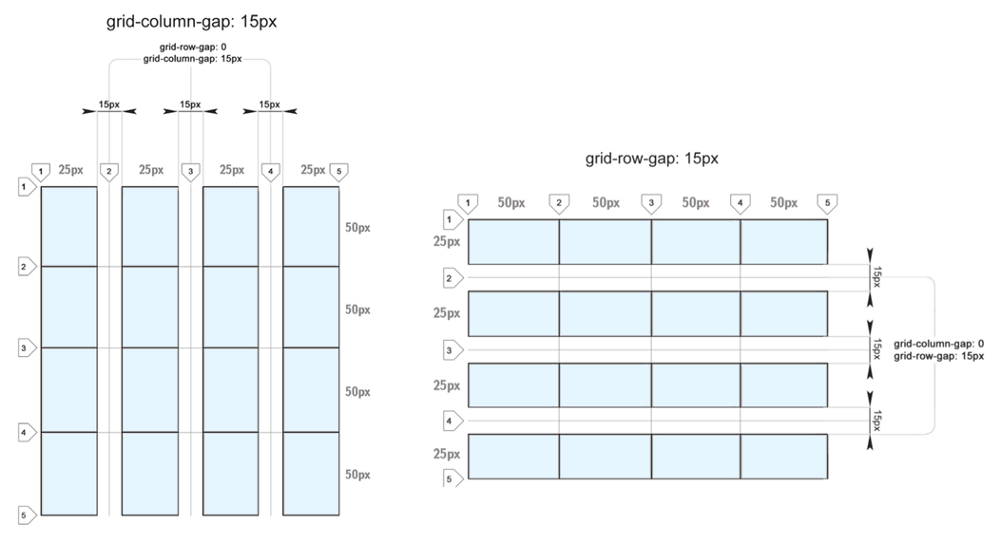
You can use varying gaps in both dimensions. perhaps this can be useful for creating video or image galleries:
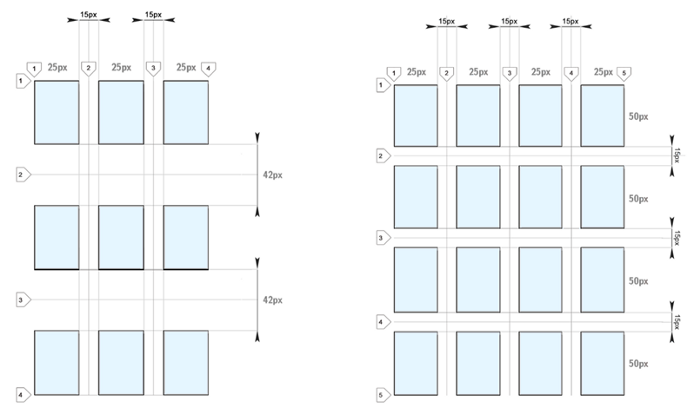
Gaps across dimensions (columns and rows) can differ in size. But gap size is specified once for all gaps in the grid in a given dimension. As you can see here — gaps of varying size within the same dimension are not allowed:
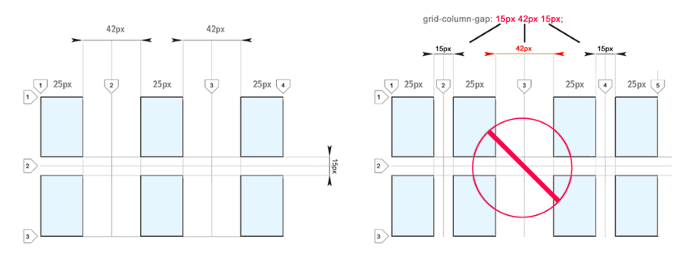
I really wish varying size gaps were possible. I can see how this can actually be useful. Some suggest to use empty tracks in order to achieve a similar effect.
FR units (Fractional Units)
Fractional (fr) units are unique to CSS grid.
A fractional unit allocates relative to all other elements in the parent:
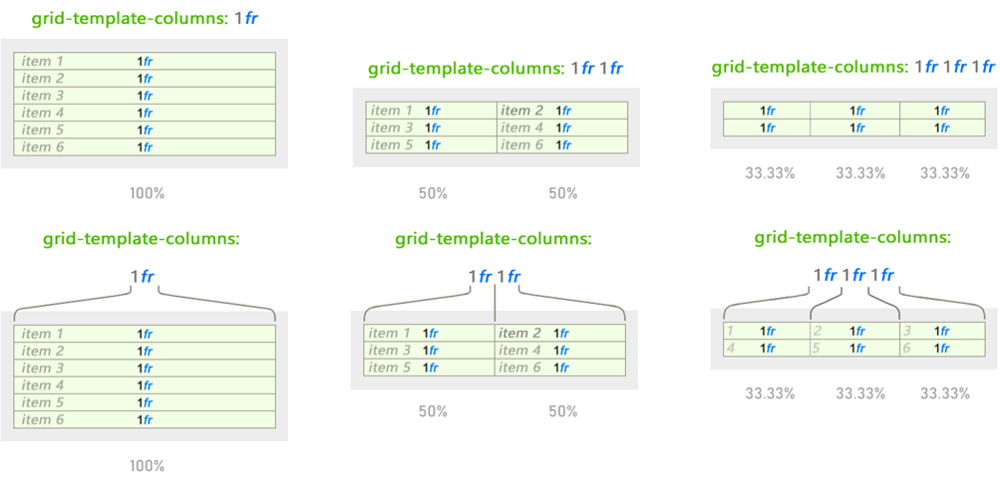
The behavior changes but 1fr remains the same regardless whenever different values are used. Fractional units work similar to % values but they are easier and more intuitive to divide space with:

(Behavior of fractional units (fr unit) changes based on all values provided in either dimension.)
In this example only column-wise behavior is shown for simplicity’s sake. But it works the same for rows too. Simply use grid-template-rows property.
Fractional Units And Their Relationship To Gaps
Space defined using fractional units changes based on gaps. The same 1fr within the same parent will shrink to a smaller size when gaps are added:
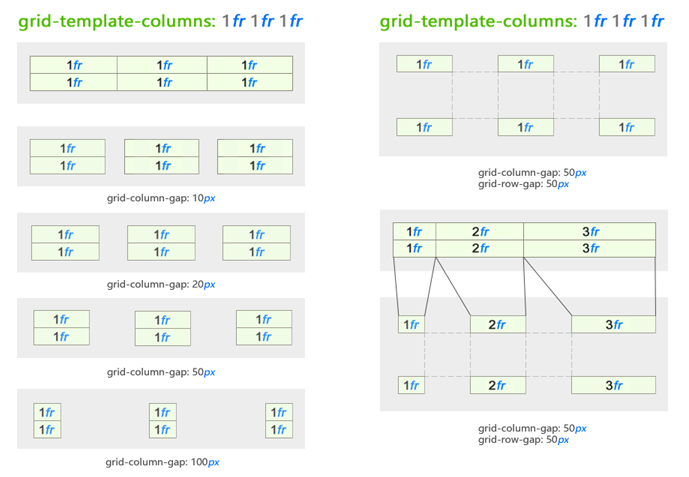
(Here we added gaps to cells specified using fr units.)
As you can see, this gives you a pretty good set of properties to space content basically in any way you wish without worrying about pixel values.
These new dynamics render pixel-perfect design as a thing of the past. We will now think about layout design using the intuitive approach!
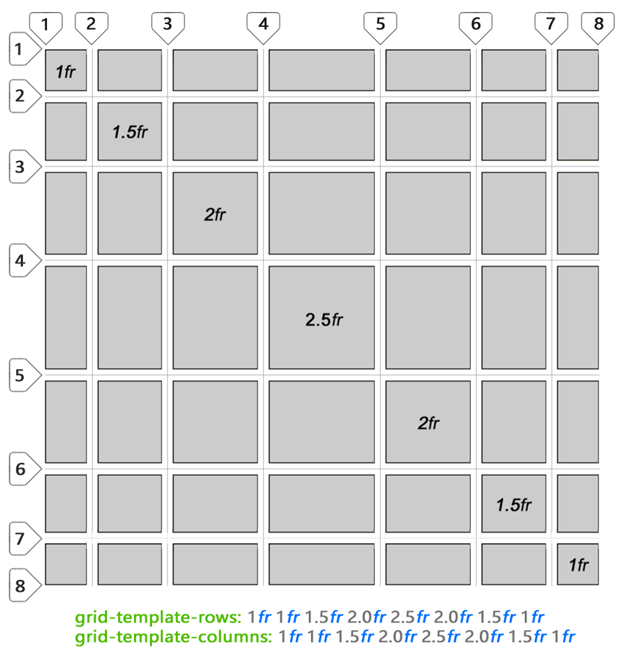
Finally, to give you a better idea of using non-whole fractional units here is a fun grid I created. You can specify them using floating point numbers too:
Content Placement
We’ve just dissected the CSS grid anatomy. Hopefully you get a better idea of how CSS grid structures content. But now we need to get creative and actually place some items inside it. How it’s done might modify default behavior of the CSS grid. We’ll explore how this happens in this section.
To arrange your items across cells or template areas on the grid you will refer to them by lines between cells. Not <table>-like spans.
CSS grid does allow using spans for determining width and height of the content area (in cell space) just like tables. We’ll explore that in just a bit. But you still can and probably should specify the starting cell using line numbers or named lines (more on this in a bit.) This depends on your preference.
As far as content placement across multiple cells goes the most obvious and tempting thing is cell spanning.
Cell Content Spanning
You can span an item across multiple cells.
Important: Spanning changes location of the surrounding items.
Spanning using grid-column and grid-row
Using grid-column and grid-row properties on the item element itself:
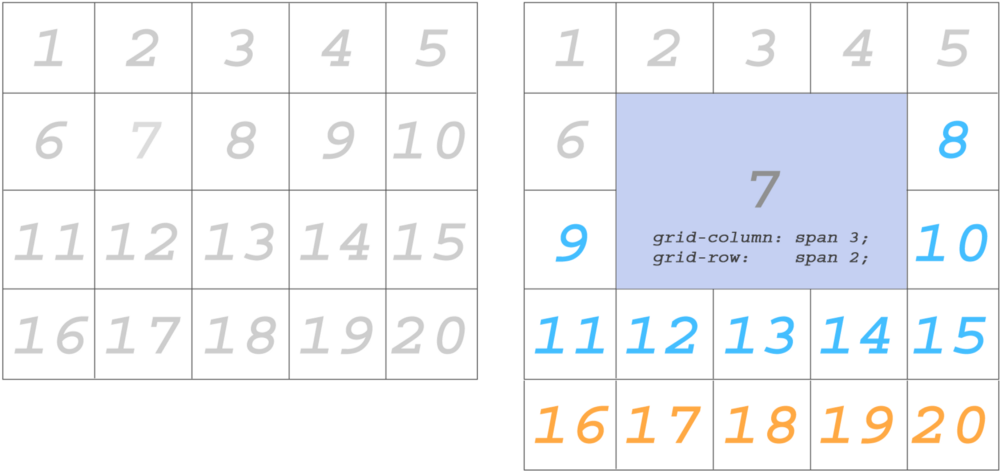
The blue items changed location after making Item 7 span across multiple cells. And orange items were bumped down a row.
There is also another way of doing the same thing…
Spanning using grid-column-start…
grid-column-end, grid-row-start and grid-row-end you can specify actual starting and ending points across which you want to span cell content.
I removed the items past 15 (orange ones) because we no longer need them:
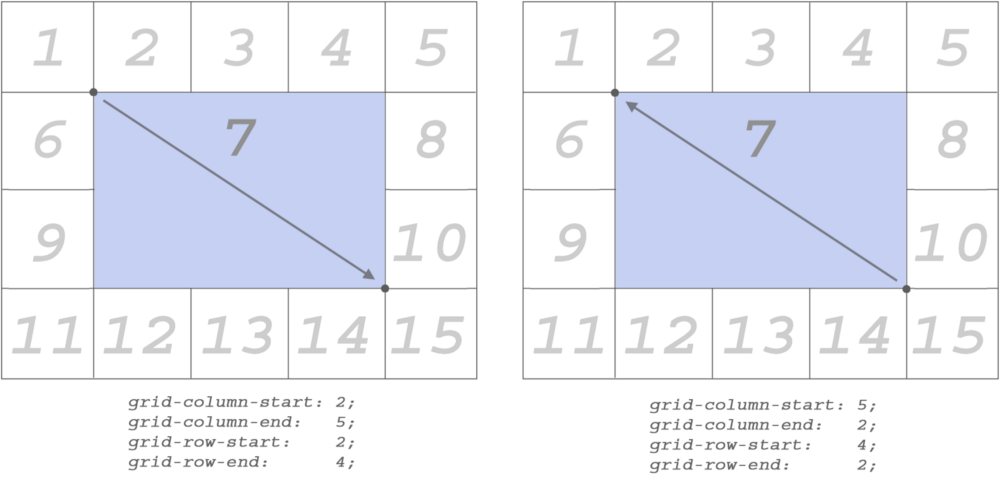
(Type these properties directly into the item you wish to be affected by them.)
Stretching content across column and row lines works in both directions.
min-content and max-content
The values min-content and max-content are supplied to grid-template-columns or grid-template-rows properties just like any other size-related value (for example px, 1fr, etc.)

Let’s take a look at this specimen. It is our starting point. We’ll change things around a bit to see how min/max values affect cells.
Let’s see what type of results will be produced if we switch one of the columns to min-content and max-content:

With one-word text there’s no difference between the results observed whether we use min-content or max-content. Here it is because hello is a single word. Its min and max values are exactly the same.
But things get interesting with more complex text. The following example will demonstrate the basic idea behind min-content and max-content:

Here min-content used longest word in the sentence (stranger) as base width.
When using max-content the entire text string with spaces filled the space.
But what happens if we apply min-content or max-content to all cells?

I noticed that by default the text was centered whenever I used min-content on it although text-align: center was not set on the item.
Images and max-content
I placed the image of this blue rose into the cell.
And just as expected, the grid expanded to allocate enough space:
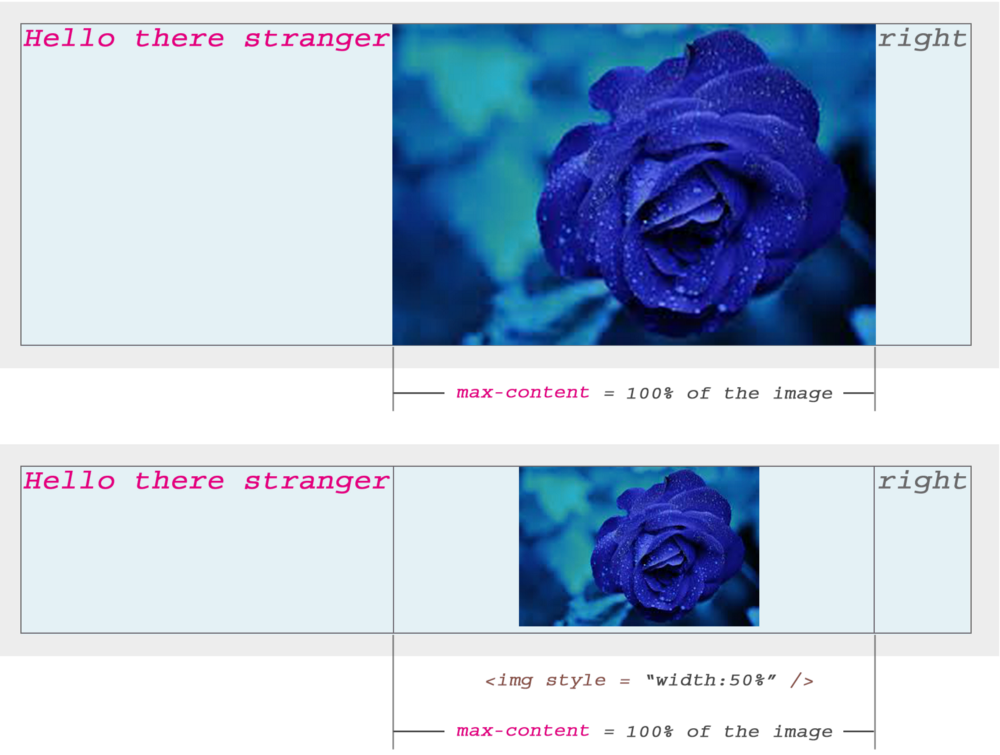
When I explicitly set the width of the image to 50% just to see what happens CSS Grid still kept cell width to 100% of the image but displayed image at 50% width (as expected) and auto-centered it horizontally within the cell.
Both text and images (or any content) will be automatically centered within CSS Grid’s cells by default.
Content Positioning
Up until this point we’ve talked about Grid’s structure in general.
In the next section, we’ll take a look at how to achieve “multi-directional” float inside cells. We won’t be using float property here of course.
Multi-directional 360° float
I don’t think CSS Grid specification calls it that. But, indeed it is possible to create exactly that… a 360-degree floating behavior.
This works on both inline and blocking elements! And I think this is my favorite feature from the entire CSS Grid’s set of abilities.
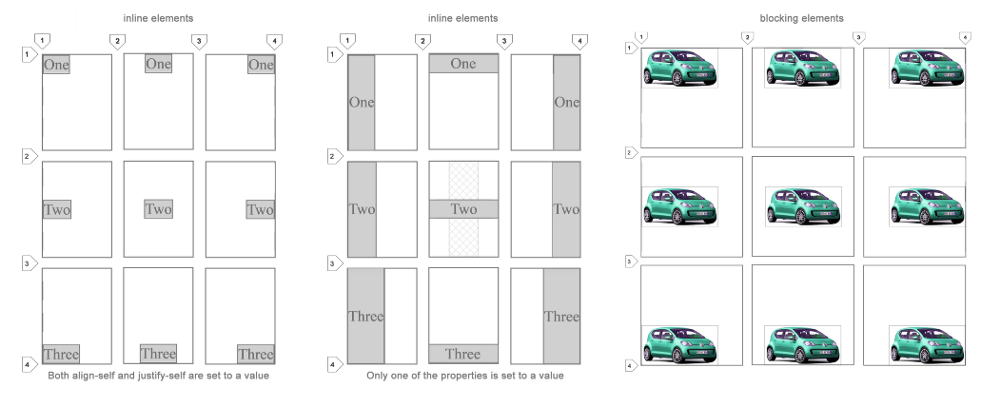
All 9 combinations are possible using align-self and justify-self properties.
They are explained below.
Align Self (align-self)
This property helps you position content vertically.

- Use align-self: start to align content to the upper edge of the cell.
- Use align-self: center to align content to its vertical middle.
- Use align-self: end to align content to the bottom of the cell.
Justify Self (justify-self)
This property helps you position content horizontally.

- Use justify-self: start to align content to the left edge of the cell.
- Use justify-self: center to align content to its horizontal middle.
- Use justify-self: end to align content to the right edge of the cell.
You can use any of the 9 justify-self x align-self combinations to align anything anywhere aka multi-directional float.
Template Areas
Template areas are defined using grid-template-areas property.
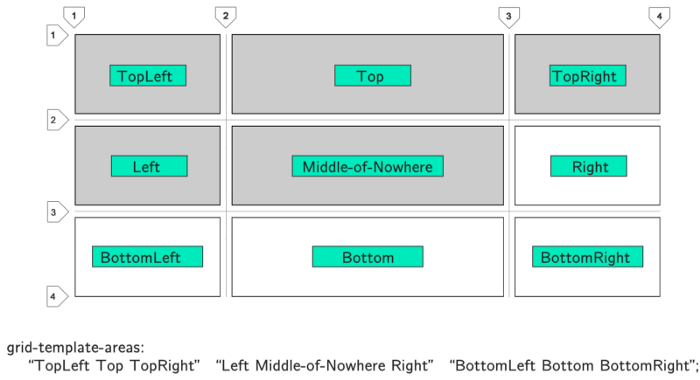
Note, template areas for each row are enclosed in double quotes.
Each column is separated by space.
In this example I simply explained how to name ares. To take real advantage of template areas you need to categorize rectangular blocks of cells by same name.
Tetris block-shaped areas are not allowed.
You can only use rectangles:
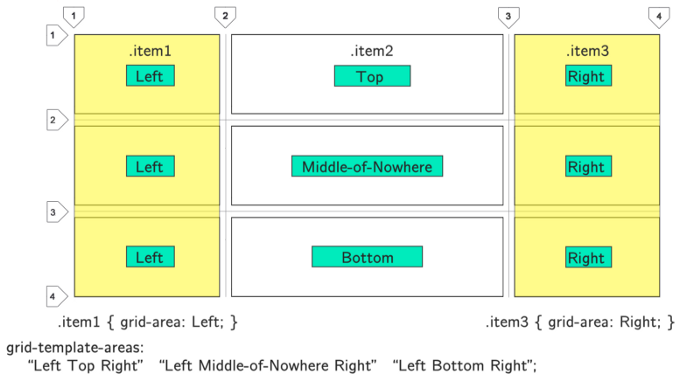
Here Left is one area spanning 3 cells down. CSS Grid automatically treats it as a single block. The same goes for Right. In this simple example I created two columns. But you get the idea. Block out larger areas by naming them.
To place an item into that area simply add grid-area: TemplateName. In this case it is grid-area: Left or grid-area: Right.
Template area names cannot use spaces. I used dashes here.
Practical Example of CSS Grid Template Areas
We now understand how to block out rectangular areas. Let’s take a look at a potentially real-world scenario. Here I’ll demonstrate a very basic layout.
I blocked a very simple website layout with two sidebars, a header and footer areas. The main area is in the center occupying 3 x 2 cell space:
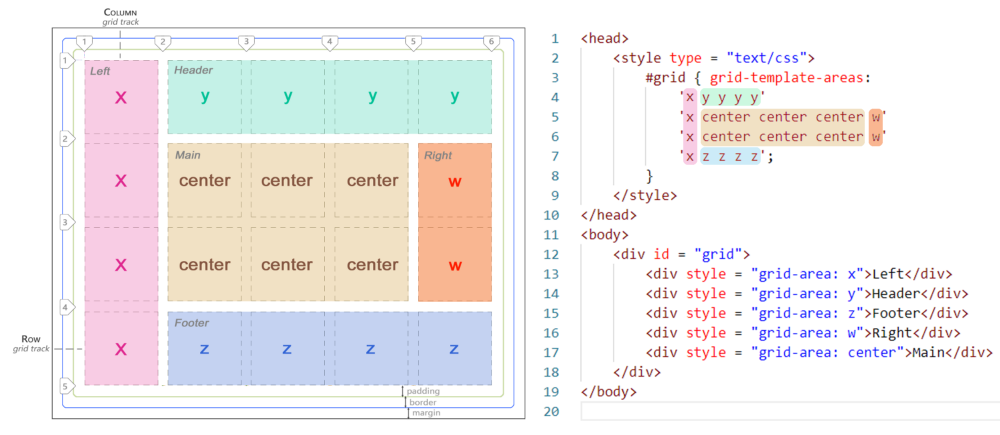
(Each color-coded area is named template area. You only need 1 HTML item element to create a grid cell for that entire area. )
Template Area Source CodeHere is an example of grid-template-areas (template areas) which is a source code recreation of what you've just seen in the screenshot above!
<head>
    <style type = "text/css">
        #grid { grid-template-areas:
            'x y y y y'
            'x center center center w'
            'x center center center w'
            'x z z z z';
        }
    </style>
</head>
<body>
    <id = "grid">
    <div style = "grid-area: x">Left</div>
    <div style = "grid-area: y">Header</div>
    <div style = "grid-area: x">Footer</div>
    <div style = "grid-area: w">Right</div>
    <div style = "grid-area: center">Main</div>
</div>
</body>
We only need 5 items here.
Add any more and they would be pushed outside of the main grid area into implicit cells.
Make sure to always keep your areas square or rectangular.
Naming Lines
Instead of always referring to lines by their number, you can also name them. This way they will be easy to remember for stretching items across multiple cells. Numbers can get tedious!
Below is a representation of what it looks like:
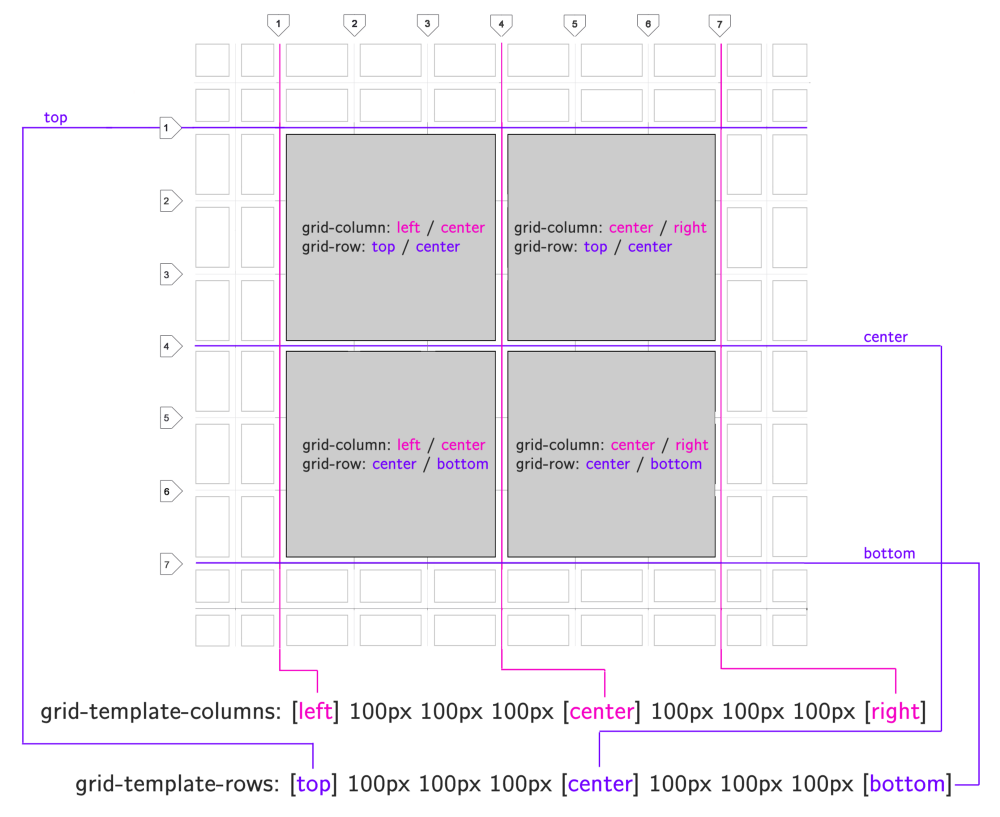
(You can also name lines (gaps) with grid-template-column or grid-template-rows property!)
Naming CSS Grid Lines Syntax
CSS grid line names are defined using brackets between regular cell dimension coordinates (they don't create new cell space, only name the lines between the cell):
grid-template-columns: [left] 100px 100px 100px [center] 100px 100px 100px [right];
grid-template-rows: [top] 100px 100px 100px [center] 100px 100px 100px [bottom];
Use square brackets to name your lines. Then use these names when specifying the length your items need to span across using / slash:
.cell-1 {
grid-column: left / center;
grid-row: top / center;
}

.cell-2 {
grid-column: center / right;
grid-row: top / center;
}

.cell-3 {
grid-column: left / center;
grid-row: center / bottom;
}

.cell-4 {
grid-column: center / right;
grid-row: center / bottom;
}
In Conclusion
CSS Grid is a comprehensive subject. Hence, this is not a complete CSS Grid tutorial on how to build actual CSS layouts. I simply used one example for each separate part as a starting point for someone new to the grid.
Hopefully information here was insightful and inspired interest in building websites using CSS Grid.
CSS Grid isn’t just an HTML element. It’s an entire system for building responsive websites and web applications.
Its properties and values describe the conglomerate of techniques learned from over a decade building websites using common HTML tags.
Get CSS Visual Dictionary!
(my coding book)
Hey guys, making tutorials like this one can take weeks of work. Just the diagrams alone were done over the course of two weeks working every day! With suggestions from others the text is improved and edited over a month or longer.
You can support my work to help me continue making more web development tutorials.
CSS Visual Dictionary was the book the diagrams in this tutorial were taken from - this book is a complete classic! featuring a visual diagram for every CSS property in existence much like what you've seen in this tutorial except for everything.
Over the years the book earned ⭐ 4.5 stars rating from coding community for its dense content and complete coverage. There is a diagram on every page.
If you want to own this book grab a copy of CSS Visual Dictionary (It's an instant PDF download after purchase.)
CSS Visual Dictionary is also available on Amazon in paperback format if you want a physical copy.
Learn CSS Visually! Every single CSS property visualized in this pictorial CSS guide book!

⭐⭐⭐⭐ and 1/2⭐ - owned by over 27.1K readers.
Get this CSS book in PDF format, on Amazon or start reading this css book on your Kindle device today!
Articles Related To Undefined Community
- DaVinci Resolve 18: How To Brighten Video Clip on 23 Dec 2022 by Ghost Together
- How To Fade Out In DaVinci Resolve (Fade In To and From Black) on 20 Dec 2022 by Ghost Together
- How To Animate Zoom Effect In DaVinci Resolve 18 on 20 Dec 2022 by Ghost Together
- Zoom In On Video Clip In Davinci Resolve 18 on 18 Dec 2022 by Ghost Together
- asdasdasdasdasd on 10 Dec 2022 by Ghost Together
- How to Install MinGW w64 64-bit on Windows (C/C++ Compiler) on 3 Nov 2022 by Ghost Together
- How To Crop Video In Premiere Pro on 20 Sep 2022 by Ghost Together
- How To Change Font Size In VSCode (Visual Studio Code) on 29 Jul 2022 by Ghost Together
- How To Fix MinGW File Downloaded Incorrectly on 30 Jul 2022 by Ghost Together
- Shrink or Expand Text Selection (VS Code Keyboard Shortcut) on 27 Mar 2022 by Ghost Together
Last 10 Articles Written On Ghost Together
- The dead audience dilemma on 16 Jul 2025 by ディーン・タリサイ
- xv on 24 Jun 2024 by AndrewOcean
- How to get started on 17 Dec 2023 by Kenya
- How To Make Characters In Midjourney on 14 Dec 2023 by Ghost Together
- How to make money online on 12 Dec 2023 by DRSMS313
- How To Make Consistent Characters In Midjourney on 12 Dec 2023 by Ghost Together
- Wildfires and Wastelands on 10 Dec 2023 by A. Stranger
- How To Download, Install And Activate Davinci Resolve Studio 18 on 10 Dec 2023 by Ghost Together
- How to use LUTs in Davinci Resolve 18 on 10 Dec 2023 by Ghost Together
- Write about Association between surface of the polyp with histomorphology Polypoi... on 10 Dec 2023 by msjrez
Last 10 Undefined Questions Asked On Ghost Overflow
- Ask your first Undefined question! (Help us build the largest database of questions on any subject)

