How To Install GPT Engineer
This gpt-engineer installation guide will walk you through the process of installing GPT Engineer on Windows PC from official GitHub repository. First, we'll need to install Git and Python. Optionally you can install VSCode, but you can use any favorite IDE or text editor.
Also, you might want to add to bookmarks: how to install SuperAGI tutorial (it's similar to GPT engineer, but for everything, not just coding.)
Please watch this video to support our content network 🙂
Ironically, I don't use AI to write my tutorials, lol. It's better that way.
You might also want to see this how to use gpt-engineer video on Ghost Together channel.
Took hours to write this! Can you please share it with your coding friends 🙂 Click on button below to copy link to this article to share on WhatsApp or Discord.

So how powerful is GPT-engineer?
I created many important parts of a Twitter-alternative app with GPT-engineer.
But in this article I'll show you how to build Snake game from engineer's example folder.
Join this Twitter alternative I'm on: GhostTogether.com where you can meet others who are installing gpt-engineer right now. It's a desktop APP, but it's growing fast.
To install gpt-engineer, go to location on your hard drive, where you want it installed:
c:\>
Here I am simply on my C:\ drive.
To install gpt-engineer, you need to clone GitHub project, and it'll install it into gpt-engineer directory:
(Note, you must have git installed on your system to run this command.)
c:\> git clone https//github.com/AntonOsika/gpt-engineer.git
Once installed, go to gpt-engineer folder by issuing cd gpt-engineer command:
c:\> cd gpt-engineer
And run this command:
c:\gpt-engineer> pip install -r requirements.txt
This is the most important GPT engineer command, it builds the project:
c:\gpt-engineer> python -m gpt_engineer.main example
Note, example is the name of the project folder, under projects folder.
This is the default test project that ships with gpt-engineer source code bundle.
To create a new GPT engineer project, create a new folder in projects folder.
Then, inside your new project's folder, create main_prompt file (without extensions,) and describe your codebase in it. Save it.
GPT engineer ships with a main_prompt example file, that creates a snake game in Python.
I edited the default snake game prompt provided in projects folder to this:

It worked from first try, however I did have to manually install pygame (shouldn't GPT Engineer also install the required modules?)
Anyway, it took hours to create this page, together with this tutorial.
Please share this article on Discord, social media or with your coding friends!
If this is helping, can you please share this article on Discord 🙂
Here is Snake written in Python, that was generated by gpt-engineer from my Notepad prompt above:

GPT Engineer is similar to AutoGPT but better. It is designed to write code. Or more specifically, complete codebases for a project, from a text prompt and detailed instructions.
Note: Instructions for Mac OS are similar. Just try to follow the process as close as possible. Instead of Command Line on Windows (cmd.exe) use Terminal to execute same or similar commands. Some web development experience is required.
Make sure you know how to install Git and Python, and add them both to PATH environment variable on Windows, so that git and python commands can be executed on the command line from any directory on your system.
GPT Engineer is a new GPT 4 program that you can install on your hard drive. GPT Engineer is used for generating a complete codebase in any computer language from a text prompt description. It's available for free from official GPT Engineer GitHub repository.
Note, that GPT Engineer requires an OpenAI GPT 4 API key. Every time you use it, you will be using your GPT 4 tokens. This means, you will be paying a small amount every time new code is generated.
Fastest way to learn how to install gpt-engineer is by watching this YouTube video tutorial:
How to install GPT Engineer (step by step tutorial)
For those who prefer written instructions, follow these steps to install gpt-engineer:
How To Install GPT Engineer
To Install GPT Engineer follow these steps:
- Install Git
- Install latest version of Python
- Install Visual Studio Code
- Register for OpenAI account and log in
- Generate GPT 4 API key
- Clone GPT engineer from GitHub repo
- Install requirements.txt
- Add OpenAI GPT 4 API key to GPT engineer from command line
- Create new GPT Engineer project
- Create main prompt in your new GPT engineer project
- Run your GPT Engineer project from command line
Let's go through each step one at a time.
Install Git
Git is the command that will help us clone gpt-engeineer project to our hard drive. It's essential for web development especially if you're doing a lot of Python work.
Go to https://git-scm.com/downloads and download Git for your operating system:

The site will look something like this.
Just download the file, run it and go through installation steps.
Install latest version of Python
GPT-engineer was written in Python. So we're going to install latest version of Python, in order to run commands like python, python3, pip, pip3.
Go to official Python website and click on yellow download button:

Install Visual Studio Code
Go to Google and type "download visual studio code."
Go to VSCode's homepage and download and run the installation file.
Register for OpenAI account and log in
Once you registered your OpenAI account, log in to generate your GPT 4 key. Note, first you will need to set up a payment plan. This can be done through navigation bar on the left hand side.
Generate GPT 4 API key
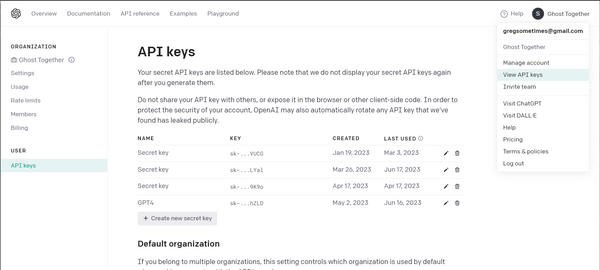
Once you registered and phone-verified your OpenAI account, log in and click on your username in the upper right corner. Then select View API Keys option.
Here is the direct link where you can generate API keys on OpenAI dashboard.
Here you can generate your GPT 4 key as shown in the image:

Just click on Generate new secret key button, and save the API key in Notepad.
Note that for security reasons, OpenAI does not store your key in text format. This is the only opportunity you will have to copy and paste your API key elsewhere.
Keep it in a safe place. We're going to need to enter this key in a later step, where we will let gpt engineer known what our GPT 4 API key is. This is required for making it work.
Clone GPT engineer from GitHub repo
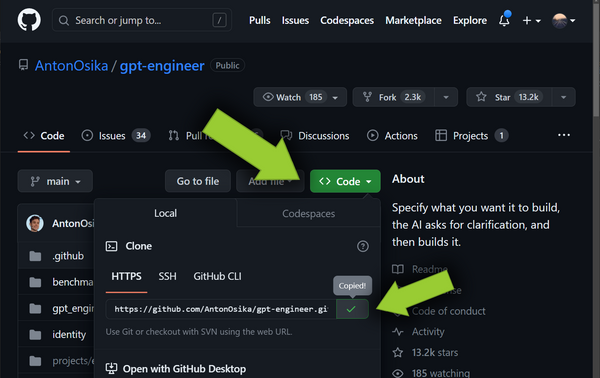
Go to gpt-engineer GitHub repo, and copy the GIT project file from green button:

Now that GIT is installed, we can go to cmd.exe and execute the following commands:
Running this command will create a new gpt folder on C drive:
c:\>mkdir gpt
To switch to newly created gpt directory, use cd gpt command:
c:\>cd gpt
Then to clone GPT engineer GitHub repo to that folder we run git clone command with URL of the project:
c:\gpt> git clone https//github.com/AntonOsika/gpt-engineer.git
After this gpt-engineer will be installed at this location.
But there is one more thing. We now need to also install requirements.
Install requirements.txt
Many Python projects contain requirements.txt file. It contains a list of dependencies this project relies on. Dependencies are Python library modules used by this program. It cannot run without them.
To install project requirements, run this command:
c:\gpt> pip install -r requirements.txt
The pip command is simply Python's package installation manager.
It's often used for installing individual modules.
But when you pass a text file to pip it will install all modules listed in that text file.
Now we're ready to add API key and run our first git-engineer project!
Add OpenAI GPT 4 API key to GPT engineer from command line
Remember that OpenAI key we generated earlier?
We're going to need it now. Copy it from saved location.
Let's say your GPT 4 API key is:
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
(This is just an example, use your own.)
To link this API key with gpt engineer, execute the following commands, based on Operating System or command line environment you're in:
For Windows (Command Prompt):set OPENAI_API_KEY=sk-yg9YPvbd7JBsKOcOK7ljT3BlbkFJvTRlByU1MpGJ7YRzTTVuFor Windows (PowerShell):
$env:OPENAI_API_KEY="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"For Linux/macOS:
export OPENAI_API_KEY=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
Press enter and your API key will be validated.
Create new GPT Engineer project
To start a new GPT engineer project, follow these steps:
- Run mkdir projectName on command line. Press enter
- Open project in VSCode, and locate projectName folder
- In that folder, create new blank file, called main_prompt
- In main_prompt file, type what you want GPT engineer to create, and save it.
- Run python -m gpt_engineer.main projectName command
- Replace python with python3, if you get an error.
That's it. At this point, if your Python environment is properly configured, you should be able to see GPT engineer's output in the console window. It will be generating your codebase based on the text prompt in main_prompt file in your project folder.
Create main_prompt file in your new GPT engineer project
This is the file where your main text prompt, instructing GPT engineer what codebase you want to build, is located. Whatever you write here, GPT engineer will try to use as instructions for building the app.
Run your GPT Engineer project from command line
To run your GPT engineer project, follow these steps:
- Open your cmd.exe on Windows or Terminal on Mac.
- Navigate to gpt-engineer directory using cd command.
- Execute python -m gpt_engineer.main projectName command.
Replace projectName with the folder name of your project.
Replace python with python3, if you get an error.
Errors like these are always associated with improperly set up Python environment.
Look into tutorials on how to properly set up your Python env, in order to fix this.
(This has nothing to do with GPT engineer itself, and requires knowledge of some web development basics.)
GTP-Engineer Installation Errors You Might Run Into
These are Python errors in disguise.
If you're not a web developer, you might install Git and Python in a rush, not realizing Python might already be installed on your system. Or maybe your Python environment is not properly set up. Due to misconfigured Python environment, you will run into errors like this one:
Traceback (most recent call last):
  File "/websites/gpt-engineer/gpt_eng/bin/gpt-engineer", line 5, in <module>
    from gpt_engineer.main import app
  File "/websites/gpt-engineer/gpt_eng/lib/python3.8/site-packages/gpt_engineer/main.py", line 10, in <module>
    from gpt_engineer.ai import AI
  File "/websites/gpt-engineer/gpt_eng/lib/python3.8/site-packages/gpt_engineer/ai.py", line 8, in <module>
    class AI:
  File "/websites/gpt-engineer/gpt_eng/lib/python3.8/site-packages/gpt_engineer/ai.py", line 40, in AI
    def next(self, messages: list[dict[str, str]], prompt=None):
TypeError: 'type' object is not subscriptable
Please do not post these messages on GPT-engineer's GitHub repo.
This is not engineer's issue. This would happen with any project that doesn't have its Python environment not properly setup. Try StackOverflow to help you with Python env problems.
Please help share this article 🙂🙂
Ironically, I don't use AI to write my tutorials, lol. It's better that way.
Took hours to write this! Can you please share it with your coding friends 🙂 Click on button below to copy link to this article to share on WhatsApp or Discord.
Articles Related To Gpt4 Community
- How To Install SuperAGI on 2 Jul 2023 by Ghost Together
- How To Use GPT-Engineer? on 22 Jun 2023 by Ghost Together
- How To Install AutoGPT (Quick Setup Guide) on 27 Apr 2023 by Ghost Together
- What is AutoGPT? on 16 Apr 2023 by Ghost Together
- How To Use Chat GPT-4 For Free (Chat GPT4 Free Access) on 23 Mar 2023 by Ghost Together
Last 10 Articles Written On Ghost Together
- The dead audience dilemma on 16 Jul 2025 by ディーン・タリサイ
- xv on 24 Jun 2024 by AndrewOcean
- How to get started on 17 Dec 2023 by Kenya
- How To Make Characters In Midjourney on 14 Dec 2023 by Ghost Together
- How to make money online on 12 Dec 2023 by DRSMS313
- How To Make Consistent Characters In Midjourney on 12 Dec 2023 by Ghost Together
- Wildfires and Wastelands on 10 Dec 2023 by A. Stranger
- How To Download, Install And Activate Davinci Resolve Studio 18 on 10 Dec 2023 by Ghost Together
- How to use LUTs in Davinci Resolve 18 on 10 Dec 2023 by Ghost Together
- Write about Association between surface of the polyp with histomorphology Polypoi... on 10 Dec 2023 by msjrez
Last 10 Gpt4 Questions Asked On Ghost Overflow
- Ask your first Gpt4 question! (Help us build the largest database of questions on any subject)

