How To Install SuperAGI
In this article we'll go through the steps required to setup SuperAGI on your computer.
This tutorial will guide you through the process of setting up SuperAGI from its official GitHub repository. SuperAGI is free to download and install. But it works using API keys, associated with accounts that are not free. Be prepared to spend over 0.25 - 0.50c per prompt!
By specifying your API keys in SuperAGI settings, you acknowledge that by running SuperAGI prompts on your computer, you will be spending tokens linked to your GPT API accounts.
Please note, SuperAGI is a GitHub repository. This means you need to have some basic web development experience. It means knowing how to run Git commands and some command line Python basics.
Here is the YouTube video describing how to install SuperAGI on your computer:
How To Install SuperAGI On Your Computer
Installing SuperAGI requires installing some software packages. First, you'll need to install Git and Python on your System. You can use VSCode or any other IDE to edit the project. But a simple text editor is probably not enough.
To Install SuperAGI, follow these steps:
- Install Git from official website.
- Download and install Docker, then run in the background.
- Clone SuperAGI Repository.
- Navigate to SuperAGI Folder.
- Configure SuperAGI Environment.
- Generate OpenAI API Key.
- Get Pinecone API Key by creating an account and logging in to dashboard.
- Aquire your Google API Key.
- Get Search Engine ID.
- Build SuperAGI with Docker.
- Create Your First SuperAGI Agent.
- Monitor Your Agent.
Install Git
Git gives you ability to use git from Terminal on Mac or cmd.exe on Windows.
Most web developers already have git installed.
But SuperAGI is not always sought after experienced web developers. Many interested in using AI on their own computer don't even have git set up. This is why this step is included here.
We need git because git clone is the command we need to execute in the command prompt, in order to install SuperAGI.
Running git clone will copy SuperAGI to our hard drive from its GitHub repository.
To install git, go to Git's official download webpage and click on teal button.
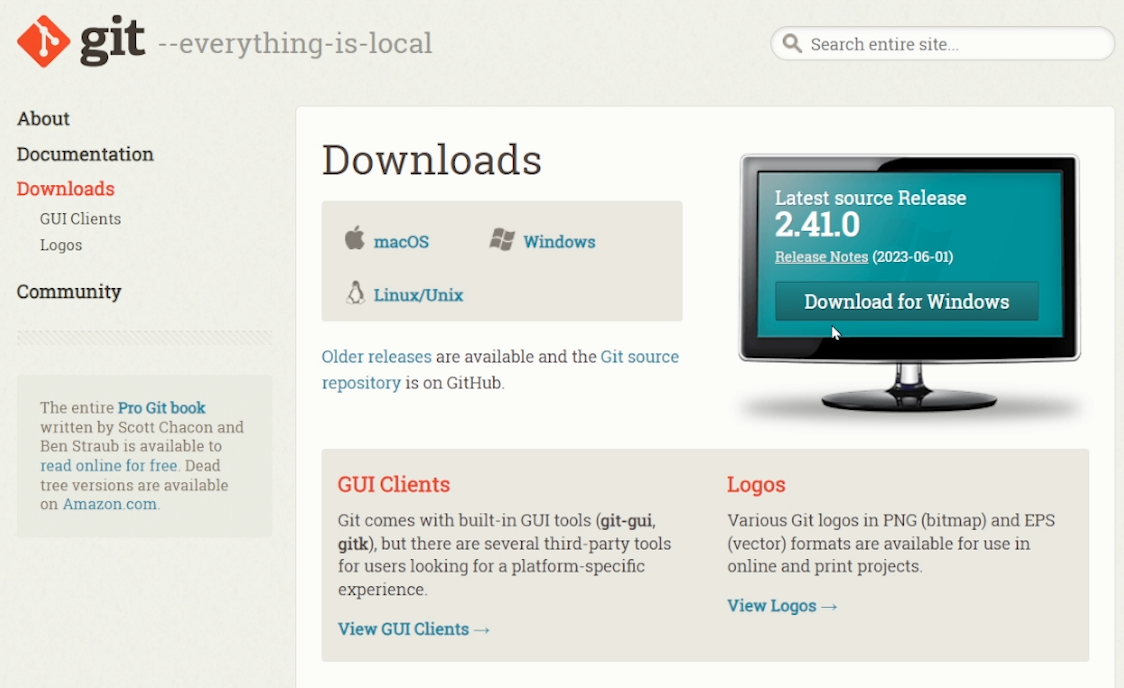
Wait for the file to be downloaded and click on it to install git.
Once installed, check if git command can be called from Windows command prompt.
Go to Start button, and type cmd.exe, and hit enter. Then type:
git --versionSo it'll look something like this:

If after running this command you see the message with git version:
git version 2.39.1.windows.1This means your git command is correctly installed, and available to be called from anywhere on your hard drive.
If you get the following error:
git is not recognized as an internal command, operable program or batch file
It means git was not installed, or it was installed but can be called only from the directory where it was installed (C:\Program Files\Git, for example) and not from the current directory you're calling it from, for example C:\.
To fix this error, we need to add path to where your git's executable is located to to environment variable called PATH, in order ot make it accessible on the command line from any location on hard drive. Not just the folder where it was installed (which is default behaviour with any Windows-installed executable program.)
To make a program accessible from any location on your hard drive, you need to add the path to the folder where it's installed, together with program's executable name (git.exe for example,) to Environment Variable called PATH.
Simply go to Start button, start typing environment variables and press Enter
Here is the complete tutorial on how to add a program to environment variables which can be git, python or any other executable program.
Then go to Environment Variables button, and add your git path to PATH variable.
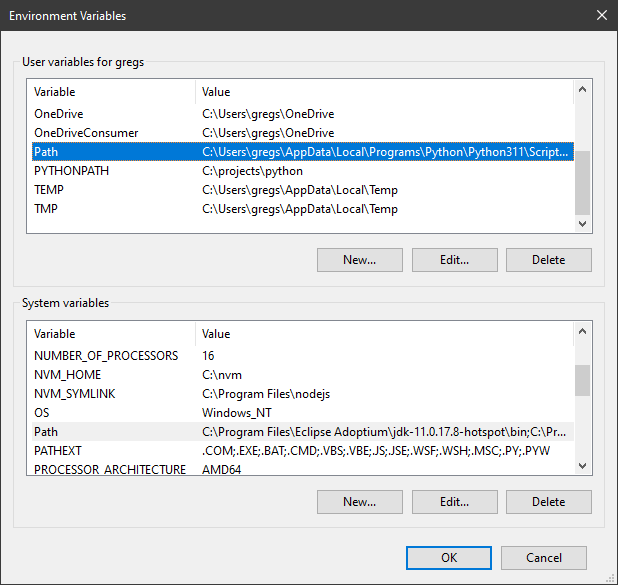
This is the window where you enter your environment variables.
If you need to do this, head over to how to add python to environment path tutorial.
You can, and probably should, add git.exe, python.exe and other programs using instructions in the tutorial linked above.
Once you arrive on the Environment Variables window, you'll see two boxes:
One one top is user variables.
The one at the bottom is system variables.
They both have PATH variable.
To learn more about difference between user variables and system variables go to this other articles on this site.
Set Up Docker And Upgrade WSL Kernel
Begin installing SuperAGI, by first setting up Docker on your Windows computer.
Type "download docker" on Google, and go to first search result.
Or simply go to Docker Desktop web page.
Click on download Docker button, and execute installation file.
Go through steps.

To do this, navigate to the Docker's official website, download and install Docker, and make sure it's running. Keep Docker active in the background as we move through the next steps.
Also make sure to upgrade your WSL. During Docker installation, you might get "Docker Desktop requires a newer WSL kernel version" error:
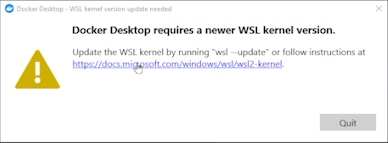
To solve this error, click on the WSL2 kernel link in the message box.
Then click on the WSL2 MSI installer link, wait for file to download and double click on it to upgrade your WSL. The latest version of Docker requires this.
WSL is Windows Subsystem for Linux, it allows you to run bash commands and make Windows behave Linux-like on the command line. (Execute linux commands like ssh on windows.)
Docker window will look like this:
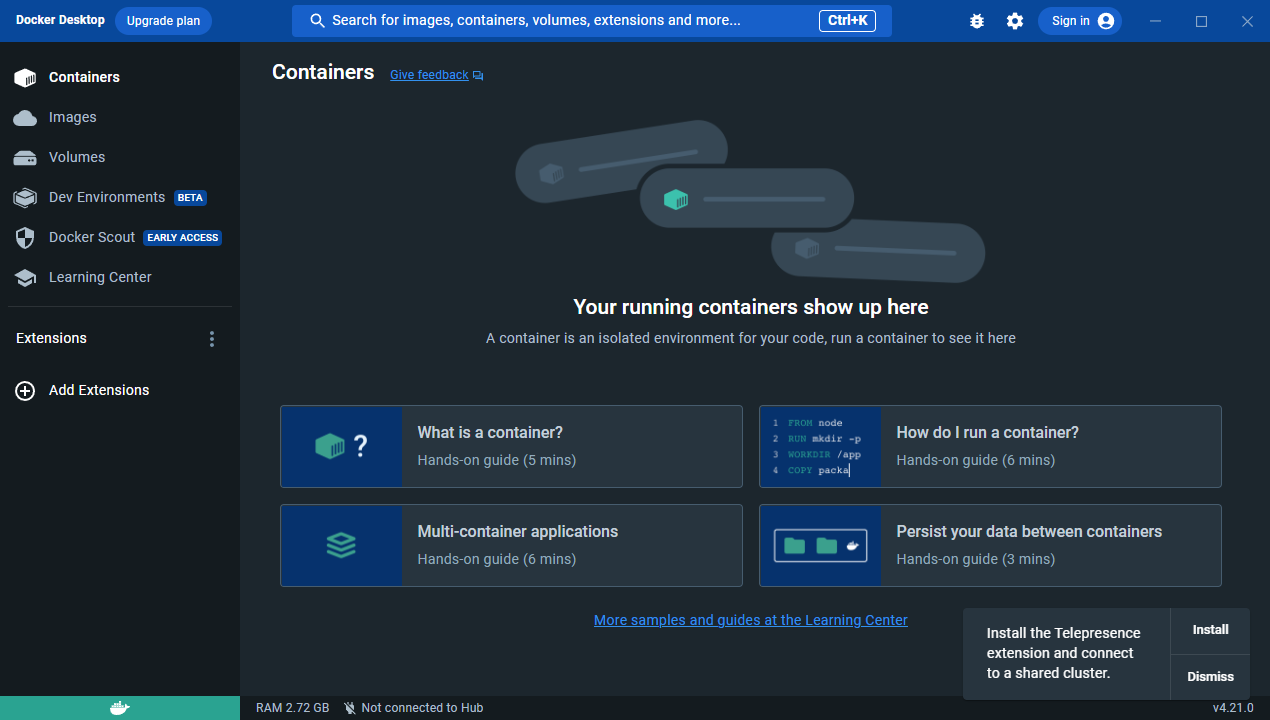
Just minimize the window to keep Docker running in the background.
Clone SuperAGI Repository
Our next step in the SuperAGI installation guide is cloning the SuperAGI repository.
For this, you don't need Visual Studio Code. You can do this from any command line, bash or terminal. But I will use it anyway, because it has excellent support for multiple terminals.
Open up VSCode, find Toggle Panel button in the top right (Or press Ctrl + J) and click it to open the terminal within the program. If you don't have Visual Studio Code yet, you can download it from its official site.
Next, go to the SuperAGI GitHub repository page.
Click "copy the URL" after clicking the green 'Code' button as shown on the screenshot below:
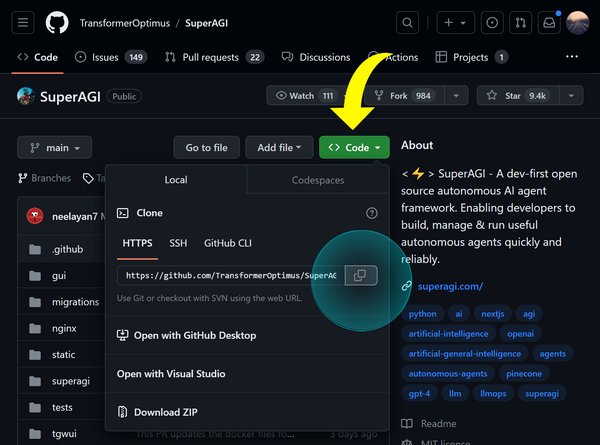
In the Visual Studio Code terminal, navigate to your desired directory (in this guide, we'll use the C drive as an example) and create a new folder named superagi:
cd C:\
mkdir superagi
cd superagi
Clone the SuperAGI repository into this new folder with the following command:
git clone https://github.com/TransformerOptimus/SuperAGI.git
Again, you can do all of this from regular command line or Terminal on Mac OS.
Navigate To SuperAGI Folder
Once you've cloned the repository, let's open SuperAGI project in Visual Studio Code.
Go to VSCode's File menu, go to "Open Folder" option, and find the directory where you installed SuperAGI (C:\SuperAGI in our case.)
In VSCode's file explorer, find C:\SuperAGI but don't double click to enter the folder.
Simply click once to select SuperAGI folder and click Open Folder button to open project.
Configure SuperAGI Environment
Open the SuperAGI's project file explorer in VSCode (it should open automatically.)
Find the config_template.yaml file in the SuperAGI directory and rename it to config.yaml
This is the file where you'll store your environment variables such as your Pinecone API key, OpenAI's GPT-4 key, Google API key, and any other keys required for SuperAGI.
Here's a screenshot of where to find this file in VSCode:
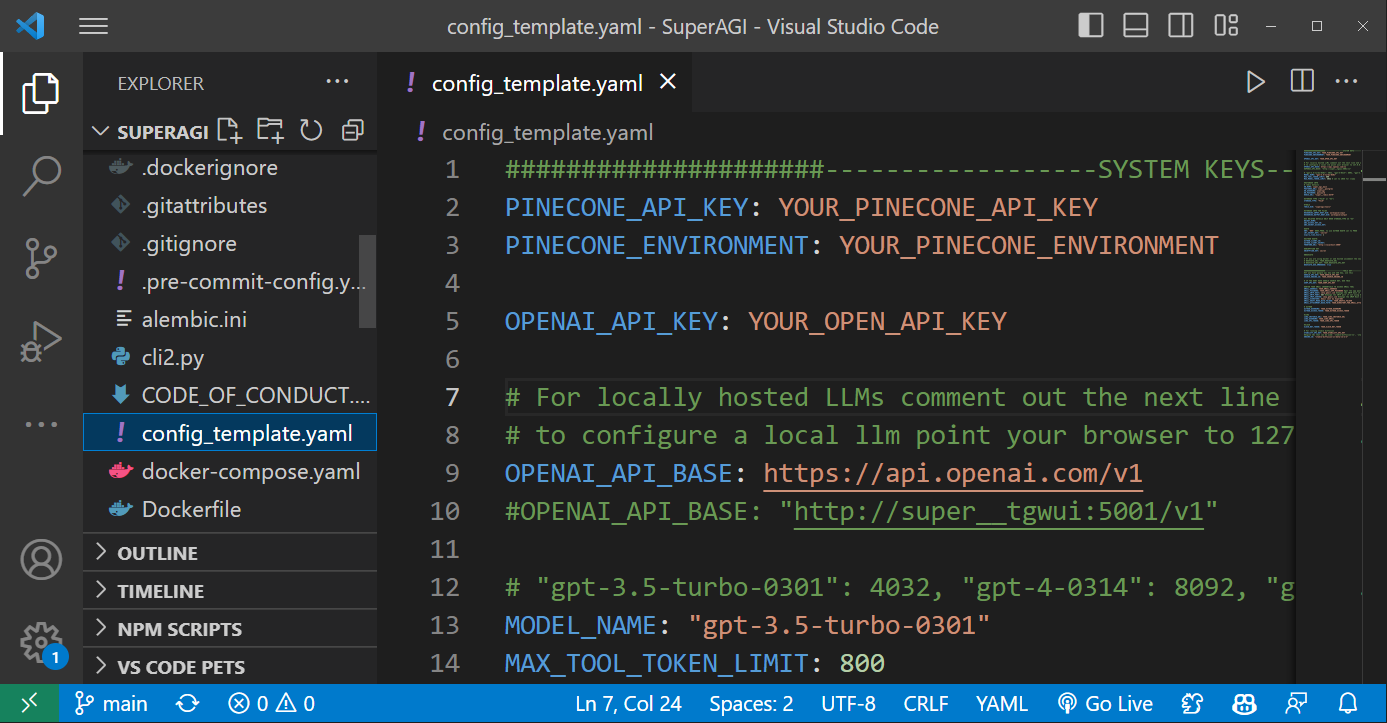
This file contains many variable names you can change. For the most part, this is where you enter your email username and password (to access email tool,) and all all kinds of AI keys associated with your paid AI accounts.
Here's the default config.yaml file as of July 3, 2024:
#####################------------------SYSTEM KEYS-------------------------########################
PINECONE_API_KEY: YOUR_PINECONE_API_KEY
PINECONE_ENVIRONMENT: YOUR_PINECONE_ENVIRONMENT

OPENAI_API_KEY: YOUR_OPEN_API_KEY

# For locally hosted LLMs comment out the next line and uncomment the one after
# to configure a local llm point your browser to 127.0.0.1:7860 and click on the model tab in text generation web ui.
OPENAI_API_BASE: https://api.openai.com/v1
#OPENAI_API_BASE: "http://super__tgwui:5001/v1"

# "gpt-3.5-turbo-0301": 4032, "gpt-4-0314": 8092, "gpt-3.5-turbo": 4032, "gpt-4": 8092, "gpt-4-32k": 32768, "gpt-4-32k-0314": 32768, "llama":2048, "mpt-7b-storywriter":45000
MODEL_NAME: "gpt-3.5-turbo-0301"
MAX_TOOL_TOKEN_LIMIT: 800
MAX_MODEL_TOKEN_LIMIT: 4032 # set to 2048 for llama

#DATABASE INFO
# redis details
DB_NAME: super_agi_main
POSTGRES_URL: super__postgres
DB_USERNAME: superagi
DB_PASSWORD: password
REDIS_URL: "super__redis:6379"

#STORAGE TYPE ("FILE" or "S3")
STORAGE_TYPE: "FILE"

#TOOLS
TOOLS_DIR: "superagi/tools"

#STORAGE INFO FOR FILES
RESOURCES_INPUT_ROOT_DIR: workspace/input
RESOURCES_OUTPUT_ROOT_DIR: workspace/output

#S3 RELATED DETAILS ONLY WHEN STORAGE_TYPE IS "S3"
BUCKET_NAME:
AWS_ACCESS_KEY_ID:
AWS_SECRET_ACCESS_KEY:

#AUTH
ENV: 'DEV' #DEV,PROD, to use GITHUB OAUTH set to PROD
JWT_SECRET_KEY: 'secret'
expiry_time_hours: 1

#GITHUB OAUTH:
GITHUB_CLIENT_ID:
GITHUB_CLIENT_SECRET:
FRONTEND_URL: "http://localhost:3000"

#ENCRPYTION KEY
ENCRYPTION_KEY: secret

#WEAVIATE

# If you are using docker or web hosted uncomment the next two lines and comment the third one
# WEAVIATE_URL: YOUR_WEAVIATE_URL
# WEAVIATE_API_KEY: YOUR_WEAVIATE_API_KEY
WEAVIATE_USE_EMBEDDED: true


#####################------------------TOOLS KEY-------------------------########################
#If you have google api key and CSE key, use this
GOOGLE_API_KEY: YOUR_GOOGLE_API_KEY
SEARCH_ENGINE_ID: YOUR_SEARCH_ENIGNE_ID

# IF YOU DONT HAVE GOOGLE SEARCH KEY, USE THIS
SERP_API_KEY: YOUR_SERP_API_KEY

#ENTER YOUR EMAIL CREDENTIALS TO ACCESS EMAIL TOOL
EMAIL_ADDRESS: YOUR_EMAIL_ADDRESS
EMAIL_PASSWORD: YOUR_EMAIL_APP_PASSWORD #get the app password from (https://myaccount.google.com/apppasswords)
EMAIL_SMTP_HOST: smtp.gmail.com #Change the SMTP host if not using Gmail
EMAIL_SMTP_PORT: 587 #Change the SMTP port if not using Gmail
EMAIL_IMAP_SERVER: imap.gmail.com #Change the IMAP Host if not using Gmail
EMAIL_SIGNATURE: Email sent by SuperAGI
EMAIL_DRAFT_MODE_WITH_FOLDER: YOUR_DRAFTS_FOLDER
EMAIL_ATTACHMENT_BASE_PATH: YOUR_DIRECTORY_FOR_EMAIL_ATTACHMENTS

# GITHUB
GITHUB_USERNAME: YOUR_GITHUB_USERNAME
GITHUB_ACCESS_TOKEN: YOUR_GITHUB_ACCESS_TOKEN

#JIRA
JIRA_INSTANCE_URL: YOUR_JIRA_INSTANCE_URL
JIRA_USERNAME: YOUR_JIRA_EMAIL
JIRA_API_TOKEN: YOUR_JIRA_API_TOKEN

#SLACK
SLACK_BOT_TOKEN: YOUR_SLACK_BOT_TOKEN

# For running stable diffusion
STABILITY_API_KEY: YOUR_STABILITY_API_KEY
#Engine IDs that can be used: 'stable-diffusion-v1', 'stable-diffusion-v1-5','stable-diffusion-512-v2-0', 'stable-diffusion-768-v2-0','stable-diffusion-512-v2-1','stable-diffusion-768-v2-1','stable-diffusion-xl-beta-v2-2-2'
ENGINE_ID: "stable-diffusion-xl-beta-v2-2-2"
Edit this file by entering all of your API keys here.
Save the file.
I'm not going to go into detail on how to get each API key from each platform.
But here are some of the common API keys you might want to aquire:
Generate OpenAI API Key
If you haven't got an OpenAI account, sign up for one.
Then log in to the OpenAI dashboard:
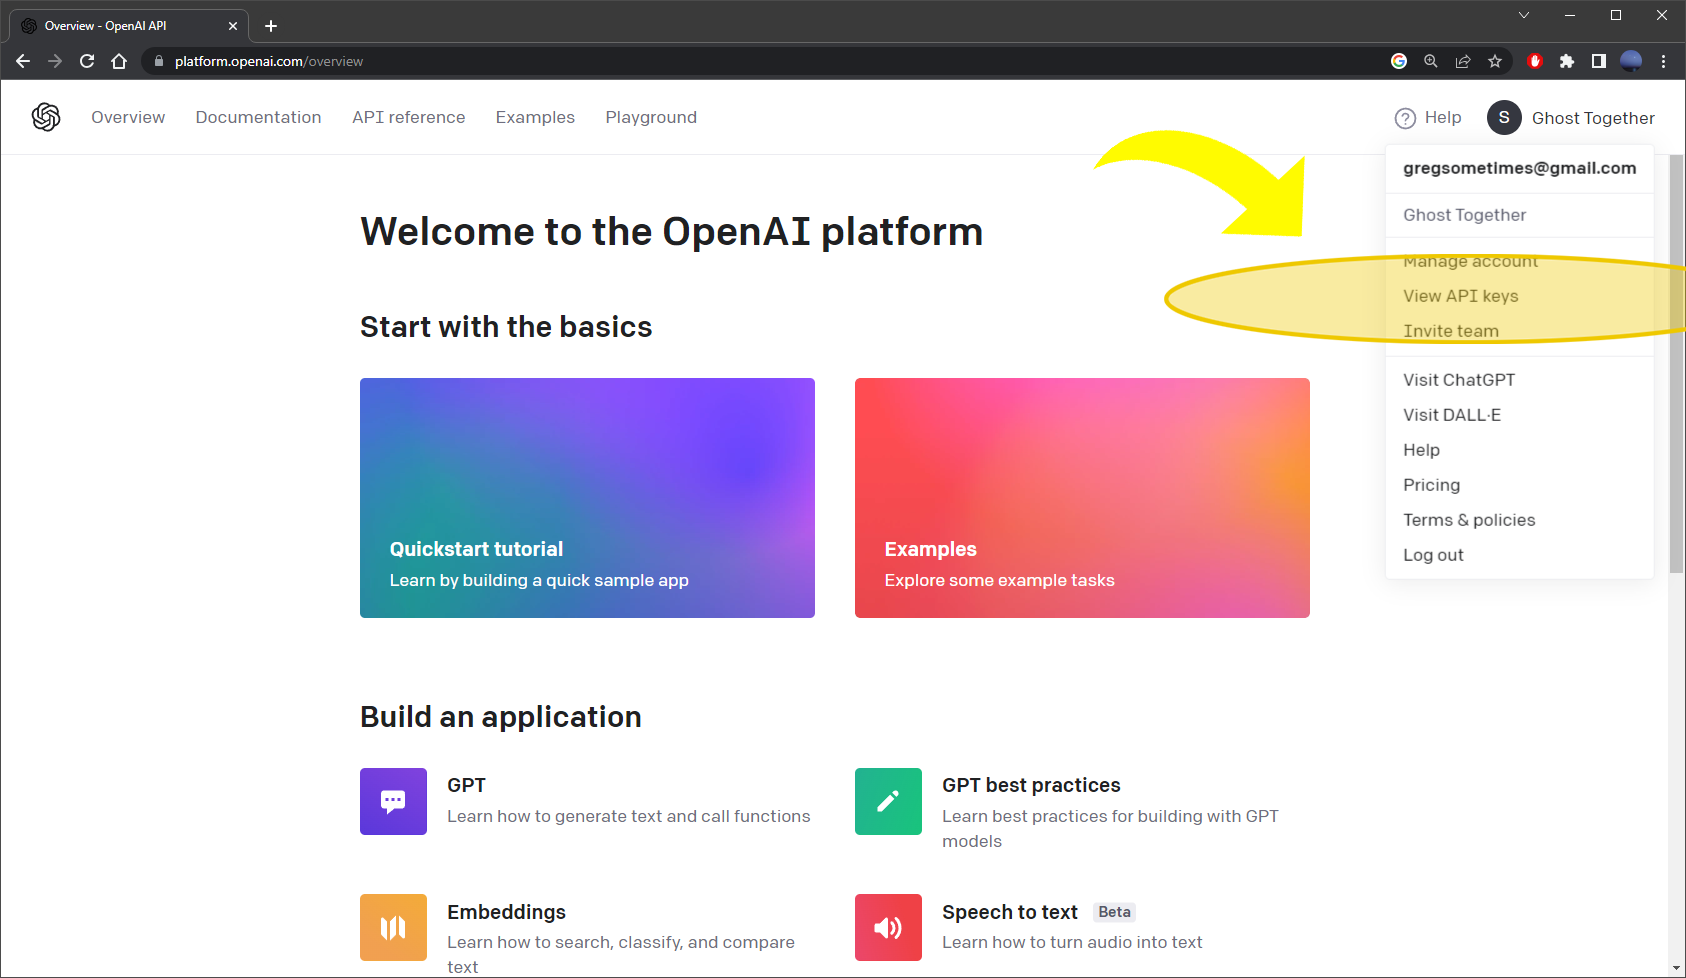
From here, go to upper right corner menu and click View Api Keys.
And on the next page, click Create new secret key button:
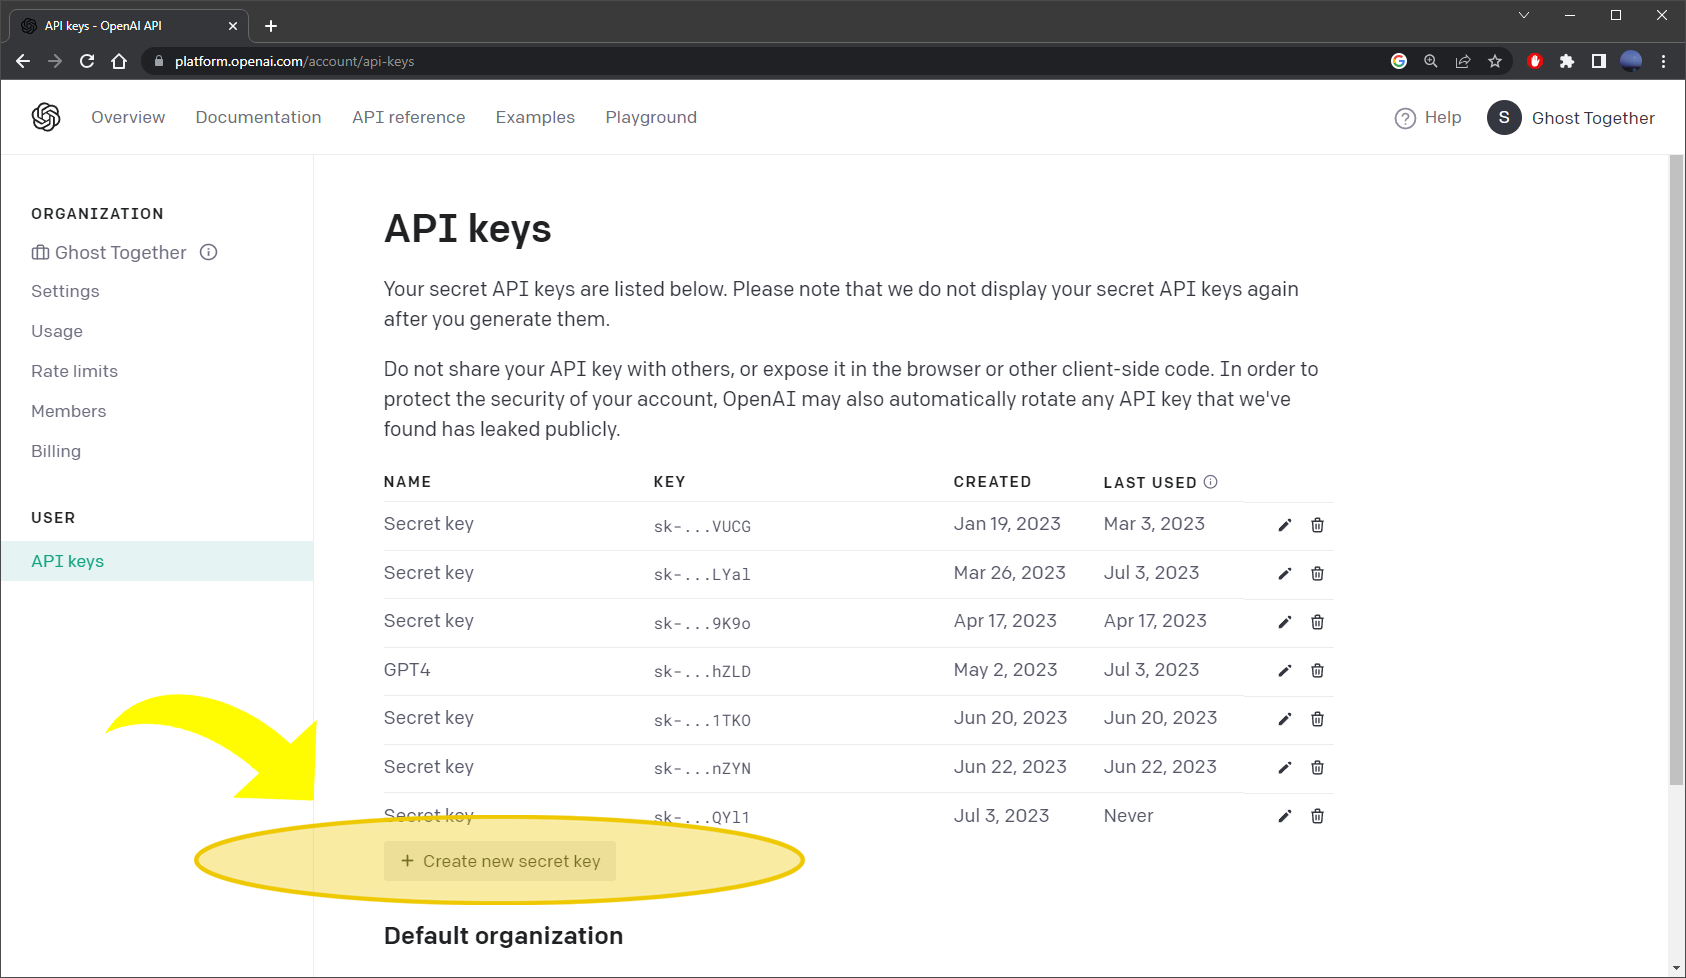
In the popup box, enter the name for your secret key and press Enter:
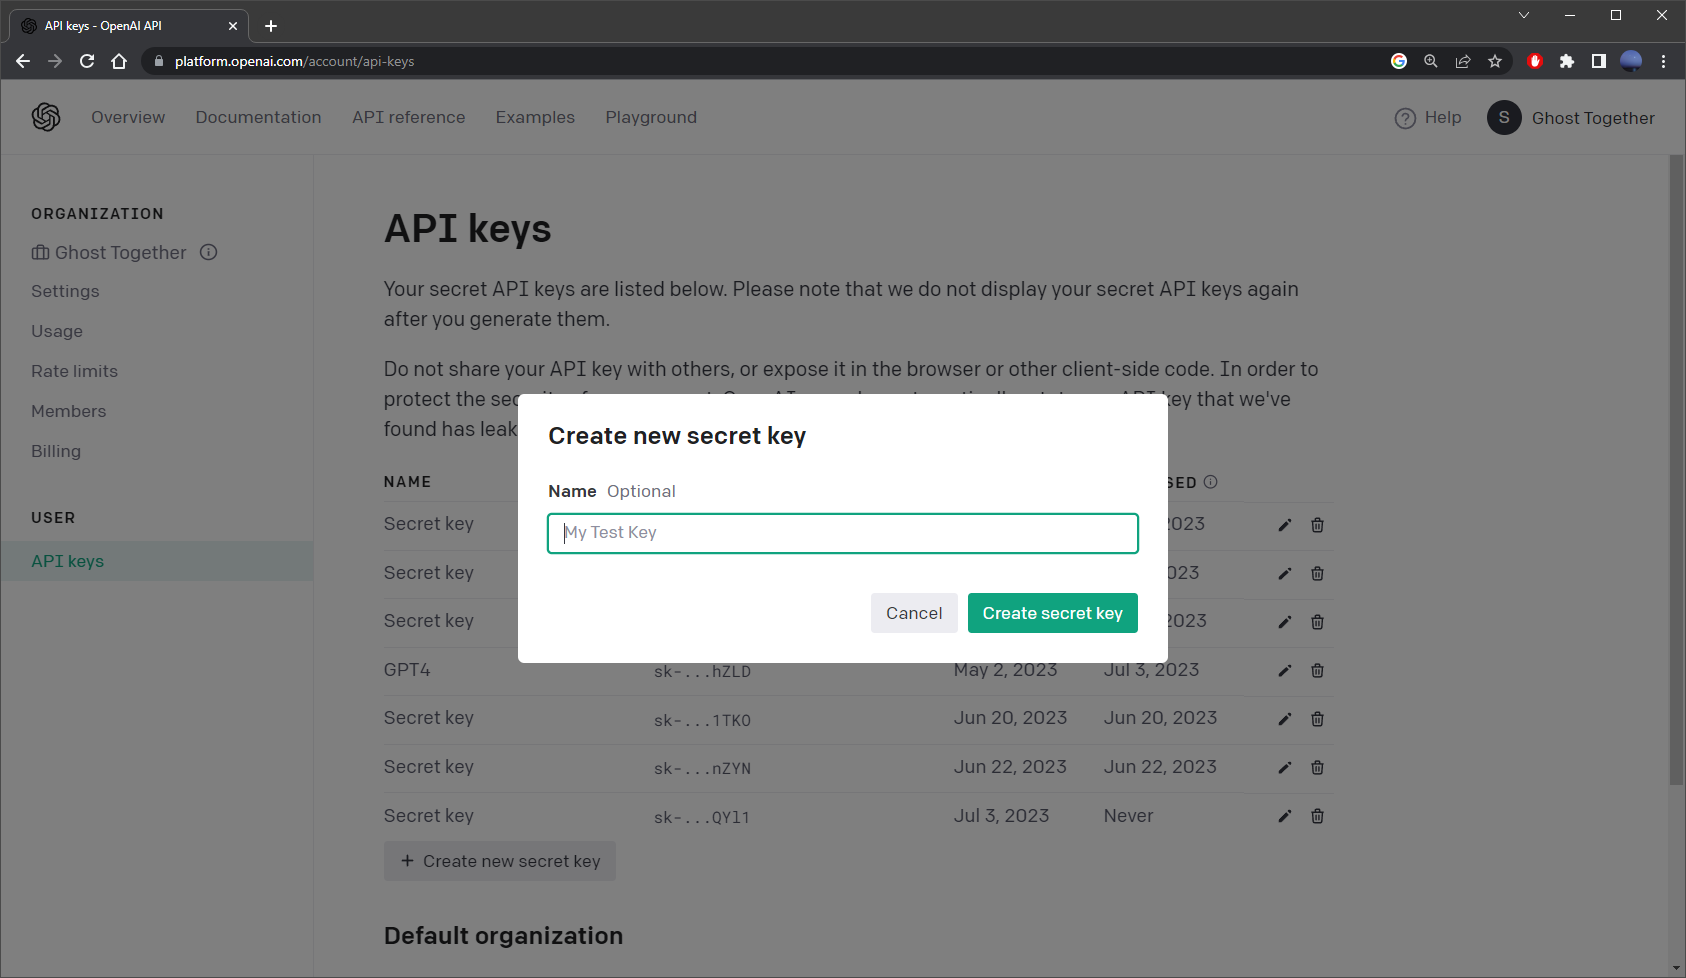
Note: this is the only time OpenAI will allow you to see the entire key. So it's important to copy it now and store it in a safe place. After you add the key to OpenAI dashboard, you'll only be able to see its 4 last digits. There is no way to see it again, for security reasons.
Now open Visual Studio Code. Take this new API key, and paste it into the OpenAI key variable OPENAI_API_KEY in the config.yaml file:
OPENAI_API_KEY=sk-RiVpMsgzRXITRjxPm0jZT3BlbkFJxV4uQTe93Jbc4bf4gKKGRepeat the process with all the other API keys from other platforms, like Pinecone API.
Get Pinecone API Key
Pinecone is a vector database that SuperAGI uses. Once your account is up and running, generate a new API key and paste it into the Pinecone API key section of your config.yaml file.
You can set up a free Pinecone account at pinecone.io. The sign up process is quick and simple. You can even use your GitHub account to create an account and log in.
Here are the two entries that you can set up in config.yaml file:
They are PINECONE_API_KEY and PINECONE_ENVIRONMENT.
Both of these values are given to you on your Pinecone dashboard.
The API key can be something like 14a3019d-0bdc-46d2-b884-5b195d801925.
And the Pinecone environment will be similar to us-west4-gcp-free.
So this is what it should look like in your config file:
PINECONE_API_KEY: 14a3019d-0bdc-46d2-b884-5b195d801925
PINECONE_ENVIRONMENT: us-west4-gcp-free
I won't go much into detail about obtaining other API keys. The process is exactly the same. Just get your API keys for that platform, and enter them into config file.
Get Google API Key
Sign up for a free Google Cloud Services account. From there, create a new project and generate a new API key specifically for the 'custom search API'. Paste this new Google API key into the respective section in the 'config.yaml' file.
Get Search Engine ID
Next, visit the Programmable Search Engine website, create a new search engine, and copy its ID. Paste this ID into the appropriate section of your 'config.yaml' file.
Build SuperAGI with Docker
With Docker still running in the background, go to your C:\ drive and type:
docker-compose --versionIf you see the following output:
Docker Compose version v2.19.0You're ready to compile and build the SuperAGI project.
It's important to first navigate to the project folder where you have SuperAGI installed from the command line using the cd command.
Generally it will be something like C:\SuperAGI or C:\projects\SuperAGI, depending on where you installed it.
Once in your SuperAGI directory, run this command:
docker-compose up --buildWhen running this command you can potentially run into the following error:
no configuration file provided: not foundThis will happen if you try to run it from a directory other than C:\SuperAGI
(Or wherever your Super AGI was installed.)
But if all goes well, you will see the installation process running in your command line:
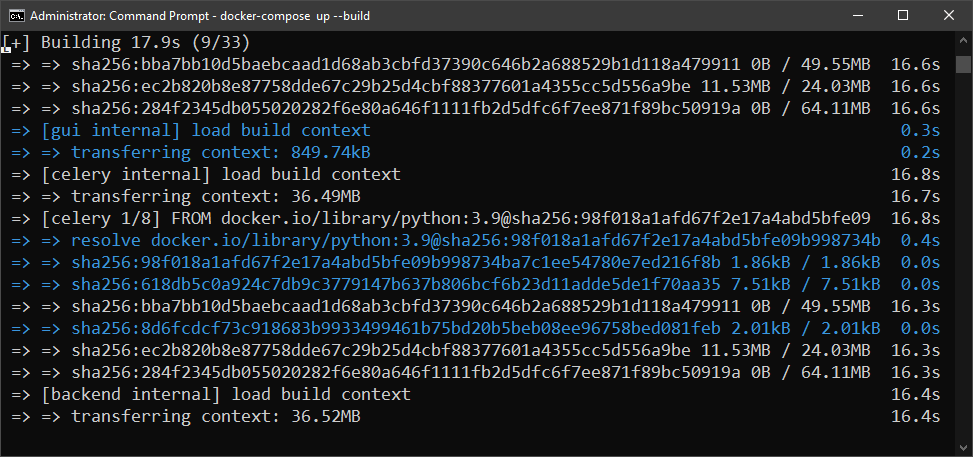
This will compile and run everything from the SuperAGI repository. The entire process of starting up SuperAGI might take about 10-15 minutes or more. But once it's completed, you will be ready to launch SuperAGI directly in your web browser.
As docker is installing SuperAGI, you might need to go through another checkpoint.
And that's allowing Docker Desktop Backend permission on the Windows firewall window that will pop up at some point during the installation. Simply click on Allow Access button:
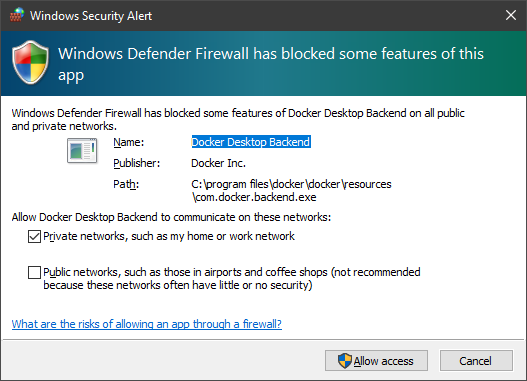
Once that is done, open your web browser and type localhost:3000 into address bar.
At this point you might see this screen saying Initializing SuperAGI:
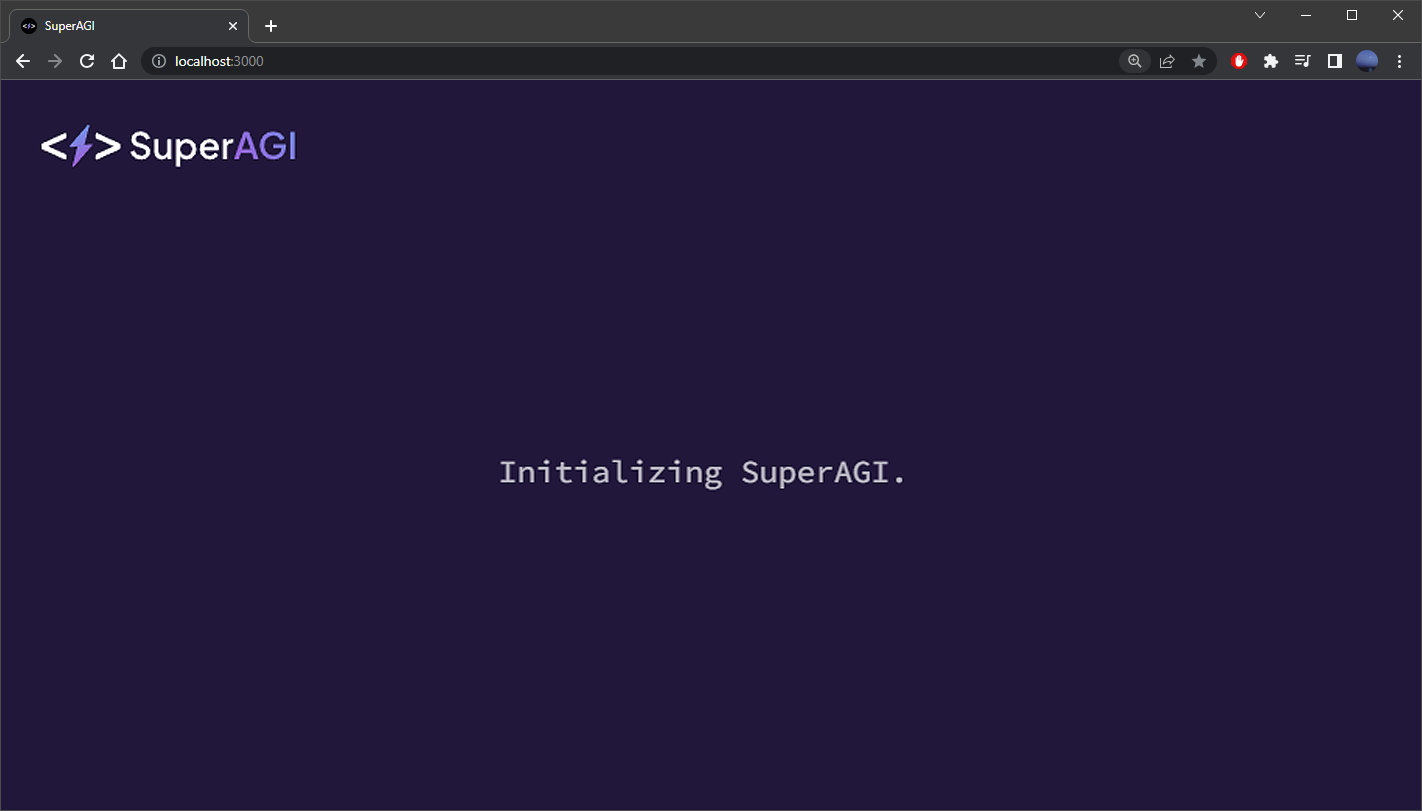
After another 10 minutes or so, you should be greeted by the SuperAGI interface, which means it's successfully running on your system:
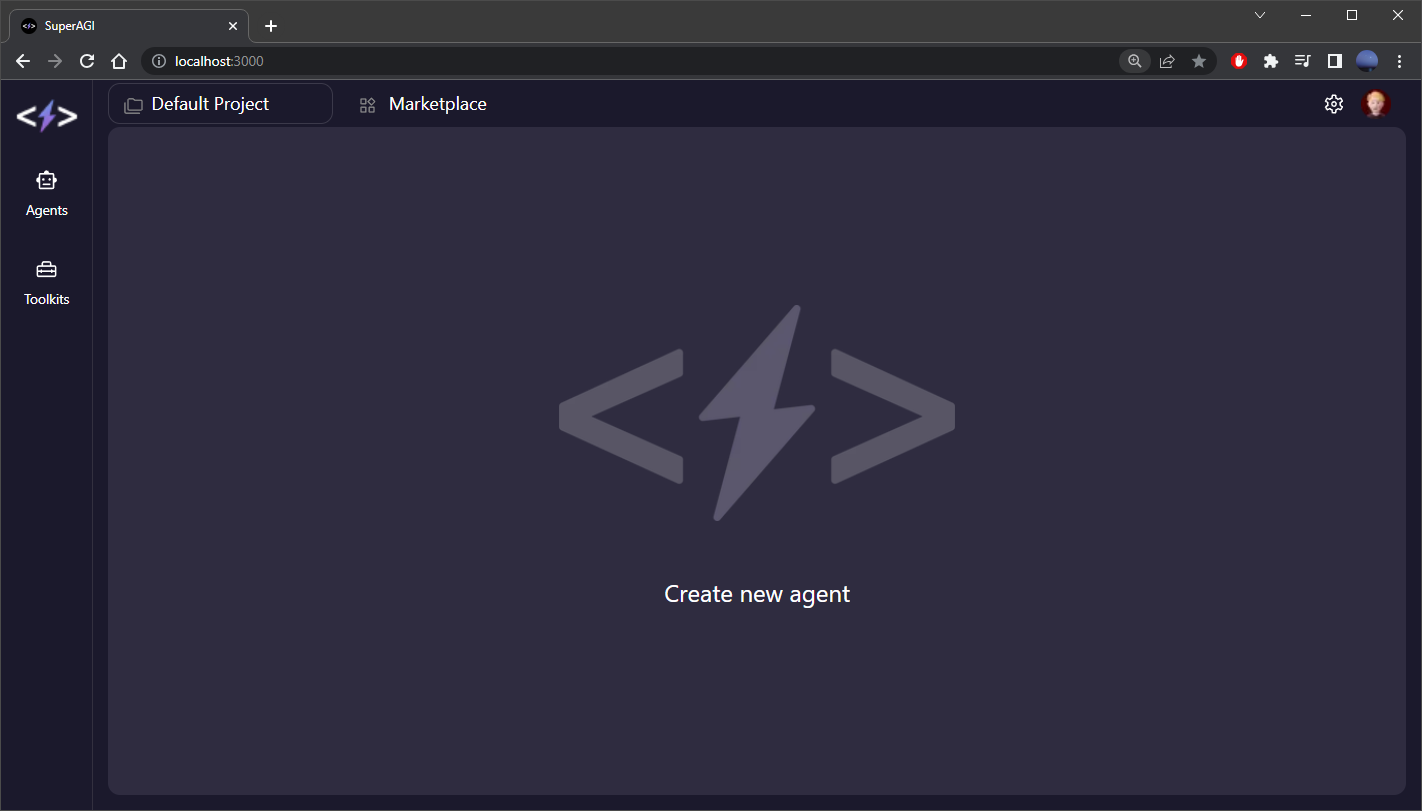
Congrats! SuperAGI is now running live on your computer and you can start using it.
Create Your First SuperAGI Agent
To create a SuperAGI agent, navigate to the 'agents' tab in SuperAGI, select 'create agent', and fill in the necessary details. You can set multiple goals and select various tools for your agent to use. Click 'create and run' to start your agent, which will be able to operate simultaneously with other agents if you choose to create more.
Monitor Your Agent
You can monitor your agent's activity by looking at the logs in Visual Studio Code. This will give you insights into how your agent is thinking, planning, and executing tasks to meet its goals.
Feel free to dive deeper into its functionalities and push the boundaries of what's possible with AGI. If you have any queries or need further assistance, please feel free to drop a comment below. Enjoy your exploration with SuperAGI!
Congratulations! You've successfully installed SuperAGI and created your first agent.
There is another program, similar to SuperAGI, called GPT-Engineer. Check out this other tutorial on how to install GPT-Engineer, which was created exclusively for writing entire codebases.
It took hours to put this material together. Please help me out by sharing it 🙂
Click button below to share link on WhatsApp or Discord or with friends:
Thanks for reading :) Hope it helped someone out there to setup SuperAGI.
Articles Related To Gpt4 Community
- How To Use GPT-Engineer? on 22 Jun 2023 by Ghost Together
- How To Install GPT Engineer on 17 Jun 2023 by Ghost Together
- How To Install AutoGPT (Quick Setup Guide) on 27 Apr 2023 by Ghost Together
- What is AutoGPT? on 16 Apr 2023 by Ghost Together
- How To Use Chat GPT-4 For Free (Chat GPT4 Free Access) on 23 Mar 2023 by Ghost Together
Last 10 Articles Written On Ghost Together
- The dead audience dilemma on 16 Jul 2025 by ディーン・タリサイ
- xv on 24 Jun 2024 by AndrewOcean
- How to get started on 17 Dec 2023 by Kenya
- How To Make Characters In Midjourney on 14 Dec 2023 by Ghost Together
- How to make money online on 12 Dec 2023 by DRSMS313
- How To Make Consistent Characters In Midjourney on 12 Dec 2023 by Ghost Together
- Wildfires and Wastelands on 10 Dec 2023 by A. Stranger
- How To Download, Install And Activate Davinci Resolve Studio 18 on 10 Dec 2023 by Ghost Together
- How to use LUTs in Davinci Resolve 18 on 10 Dec 2023 by Ghost Together
- Write about Association between surface of the polyp with histomorphology Polypoi... on 10 Dec 2023 by msjrez
Last 10 Gpt4 Questions Asked On Ghost Overflow
- Ask your first Gpt4 question! (Help us build the largest database of questions on any subject)

