How To Install Stable Diffusion On Windows
Stable Diffusion runs on localhost address at 127.0.0.1:7860 by default. But first you need to install it! Installation is simple but not always obvious. So this tutorial was created to help you get started quick.
Just follow step by step Stable Diffusion installation instructions on this page, the setup takes about 10-20 minutes, due to large checkpoint file downloads.
Please watch this video to support our content network 🙂
This is what Stable Diffusion Web UI looks like when running on localhost.
When it comes to Stable Diffusion, the installation process is relatively simple, as long as you follow all of the steps as shown in this article.
It took hours to put this tutorial together. Please help out by sharing it 🙂
Click this button to share link on Discord or with friends:
At the core of Stable Diffusion are the checkpoint files. They are usually very large, just under a few Gigabytes. Dropping these checkpoint files into your models folder will make that checkpoint appear in the drop down on your Stable Diffusion UI.
If you need quick instructions, just watch this 4 minute YouTube video:
How to install and run Stable Diffusion on Windows 11 / PC (YouTube video tutorial)
How To Install Stable Diffusion Web UI Locally
The process is quite simple, but it does take 10-20 minutes to run the installer script after downloading the files and setting up GitHub and Hugging Face accounts.
Downloading required software files and cloning Web UI
Stable Diffusion isn't a stand-alone product. In order to run it from localhost in your browser, you first need to install several software packages, including Git Bash and Python.
Moreover, you will need to sign up for GitHub and Hugging Face accounts. (It's free.)
To install Stable Diffusion on Windows, follow these steps:
- Register GitHub account.
- Register Hugging Face account.
- Install Git Bash for Windows: Git Bash (download and install.)
- Download and install Python.
- Go to Stable Diffusion WebUI GitHub Projec: webui
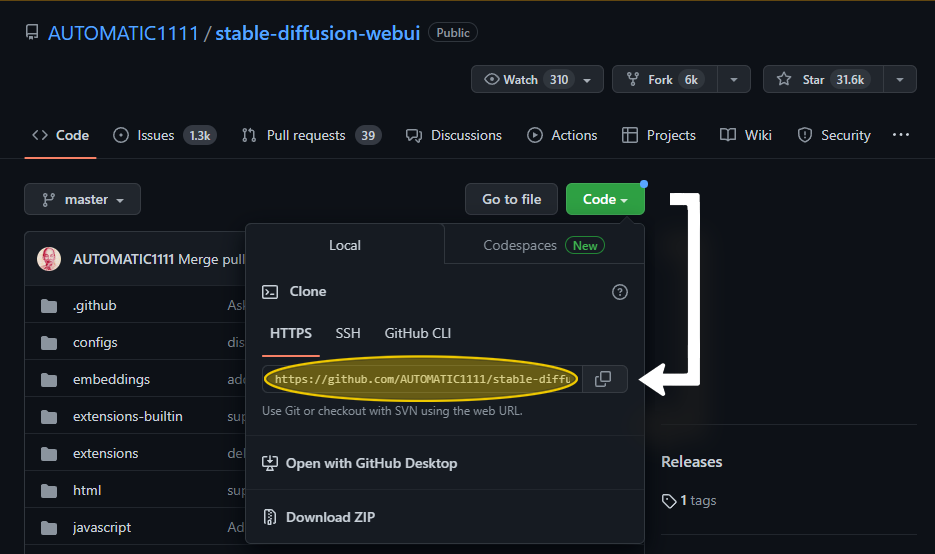
- Go to green "Code" button, and on the drop down locate "copy" button:

- Copy WebUI .git project link: https://github.com/AUTOMATIC1111/stable-diffusion-webui.git, or just copy it from this line. We are going to paste it into command line in the next steps after creating some folders.
- Open Git Bash and type the following commands:
First, create a folder ai on your C: drive using the command line:
$ cd c:
$ mkdir ai
(Or simply create folder ai on your C: drive in any other way.)
Make sure to cd into c:\ai folder you just created on the command line:
$ cd ai
Now clone the Stable Diffusion Web UI project:
$ git clone https://github.com/AUTOMATIC1111/stable-diffusion-webui.git
Now we need to download and drop some files into it.
Final Steps: Adding .PTH and Checkpoint Files To Stable Diffusion
We're almost there! Now we just need to download two files and drop them into our stable diffusion web ui folder that was created earlier when we cloned Stable Diffusion GitHub project (The folder was C:\ai\stable-diffusion-webui\).
Carefully follow next steps. We need to download and drop each files into 2 different folders.
Download and Drag The Two Files Into Respective Folders As Shown Below
Now that we downloaded and installed the required software packages, to finish Stable Diffusion installation, click to download these two files:


At this point you can consider Stable Diffusion files prepared for installation.
But we're not done yet. Now we need to actually install Stable Diffusion, by automatically downloading and unpacking a bunch of files.
Just follow instructions below to run Stable Diffusion locally in your browser.
How To Finish Installing Stable Diffusion?
Just go to C:\ai\stable-diffusion-webui folder and click on webui-user.bat to launch Stable Diffusion installer:

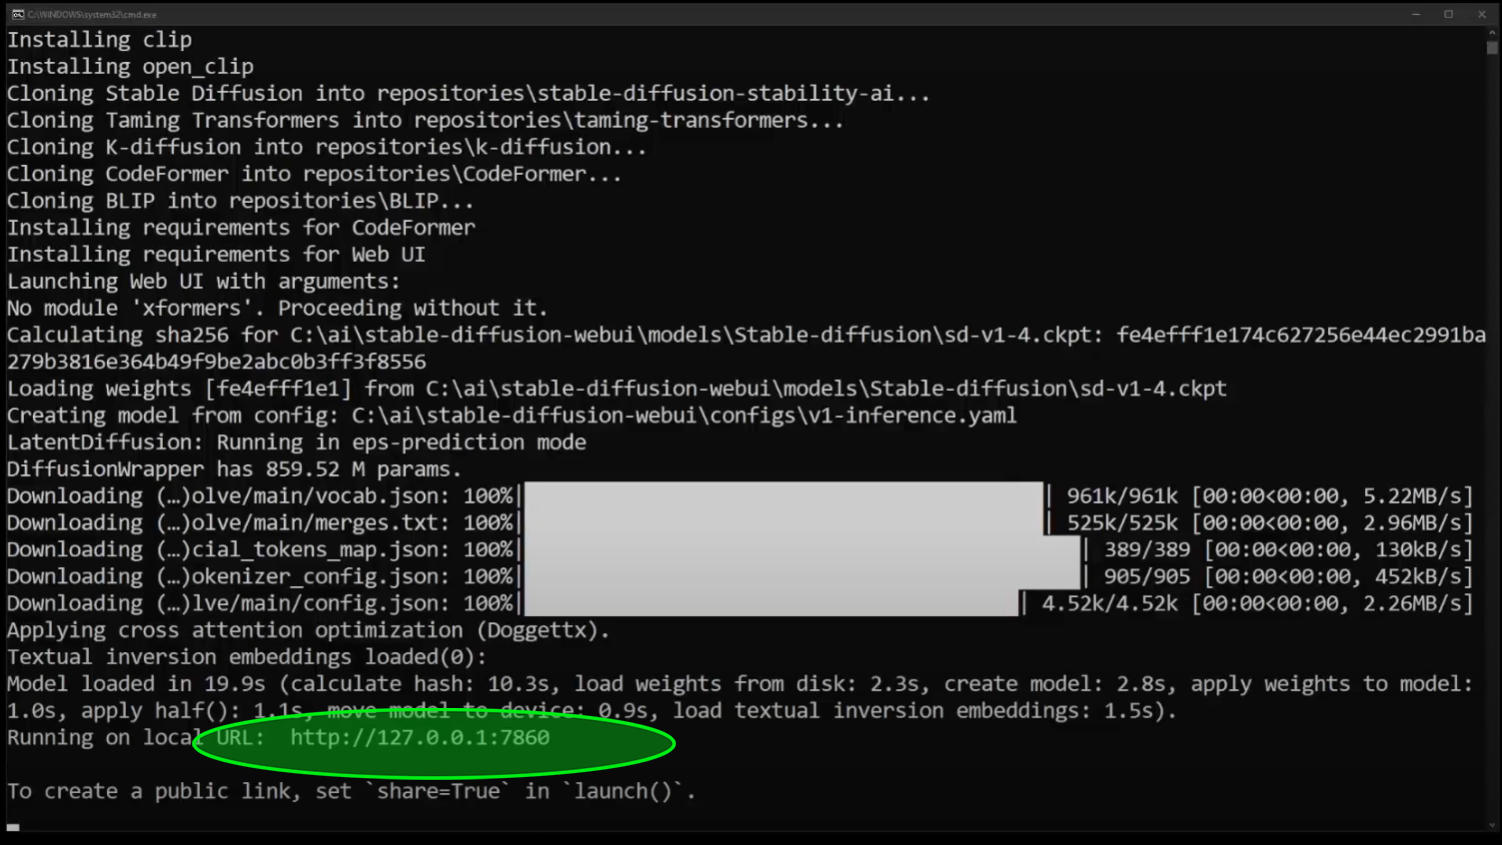
Once you click on this, a new command line window appears and installation process will begin. You will see a window like this:

Just wait 10 to 20 minutes until the installation process is completed. Don't click on the CMD window, as it might halt or pause the installation until you click on it again.
Finally at the bottom you will see URL address (http://127.0.0.1:7860) on which your Stable Diffusion is now running. Just copy and paste it into your browser's address bar.
How To Run Stable Diffusion On Localhost?
We're finally ready to launch Stable Diffusion in browser on localhost.
Simply copy and paste http://127.0.0.1:7860 into your Chrome browser.
What Is Hugging Face?
Hugging Face is a well-known NLP research organization that provides a platform for developing and deploying state-of-the-art natural language processing models.
- Develops cutting-edge NLP models trained on large datasets and can perform a variety of tasks, such as sentiment analysis, named entity recognition and question answering.
- Provides a platform for deploying NLP models in a variety of applications, including chatbots, language-based search engines, and text generation systems.
- Offers a suite of NLP tools and libraries, including transformers, tokenizers, and seq2seq models, to help developers and researchers build NLP applications.
It took hours to make this tutorial.
Click this button to share link on Discord or with friends.

