How To Run React Native In Android Studio On Windows
In this tutorial we will setup React Native development environment without Expo. We will be using react-native-cli package to install React Native in Android Studio. Yes, you can edit React Native in any IDE: WebStorm, VSCode or Visual Studio, but you still have to install Android Studio to download proper SDKs and get the emulator.
")
How to setup and run React Native in Android Studio on Windows
Yes you can edit and run your React Native App.js without Android Studio. But you still have to install Android Studio to get the SDKs and the proper Android emulator software (Pixel, Samsung, etc).
React Native is a framework that allows you to build native mobile applications.
React Native apps are written in JavaScript (often, with TypeScript added) using the React library. When you build and run your React Native app on an actual device, it will use native operating system components, rather than just HTML elements (like in PWAs), which can be sluggish.
Let's get started with React Native!
First we're going to install Chocolatey. Wait, what!
If you want to install Windows GUI apps from command line, it is best to install Chocolatey. It is suggested by the official React Native docs. Chocolatey is a Windows command line (cmd.exe) installer for Windows apps, much like homebrew, yum, apt-get, etc. on Linux-based systems.
Chocolatey will help us streamline the process of setting up React Native development environment.
To install Chocolatey from cmd.exe copy and paste this into cmd.exe:
@"%SystemRoot%\System32\WindowsPowerShell\v1.0\powershell.exe" -NoProfile -InputFormat None -ExecutionPolicy Bypass -Command "[System.Net.ServicePointManager]::SecurityProtocol = 3072; iex ((New-Object System.Net.WebClient).DownloadString('https://community.chocolatey.org/install.ps1'))" && SET "PATH=%PATH%;%ALLUSERSPROFILE%\chocolatey\bin"
You can now install Node LTS and JDK11 as follows:
choco install -y nodejs-lts openjdk11
This will install correct version of Node LTS for working with React Native.
We've also just avoided going to official websites and downloading GUI installers.
It is recommended to use JDK 11 to avoid errors that may come using a greater version.
Watch this YouTube video, outlining steps from this tutorial, to learn how to setup React Native in VSCode in under 15 minutes:
Run React Native Hello World App in VSCode with Android Emulator
Once deployed the JavaScript React code is transitioned to use native device components. This allows apps made with React Native run just like a native application.
You can use VSCode or any other IDE. React native runs on command line, regardless.
Instagram was built using React Native. React Native provides fluid UX with native-like experience, and apps created with it are used by millions of users.
In order to build an app like Instagram, you can use React Native. In this tutorial we'll set it up for running in Android Studio, a popular IDE for developing React Native apps.
React Native is a popular framework for building mobile applications that work on both iOS and Android. This makes it easy to build the application once, and have it run on multiple platforms, but how do you set it up to run in Android Studio?
To setup React Native in Android Studio follow instructions below:
Here are the steps to set up React Native for running in Android Studio on a Windows machine:
Step 1. Install Node.js
React Native requires Node.js to be installed on your computer.
NodeJS also gives us npm command (this is Node's package manager) which we will later use to install react-native-cli package.
You can download the latest version of Node.js from the official website (https://nodejs.org/) and follow the instructions to install it.
This is what enables your computer to run JavaScript from command line.
Make sure to add NodeJS to Environment Variables
Now if you're on Windows we also need to add NodeJS to PATH in Environment Variables.
Some NodeJS installers will do this step for you, but it's still best to make sure.
It's easy to get stuck on miniscule errors, when this step is overlooked.
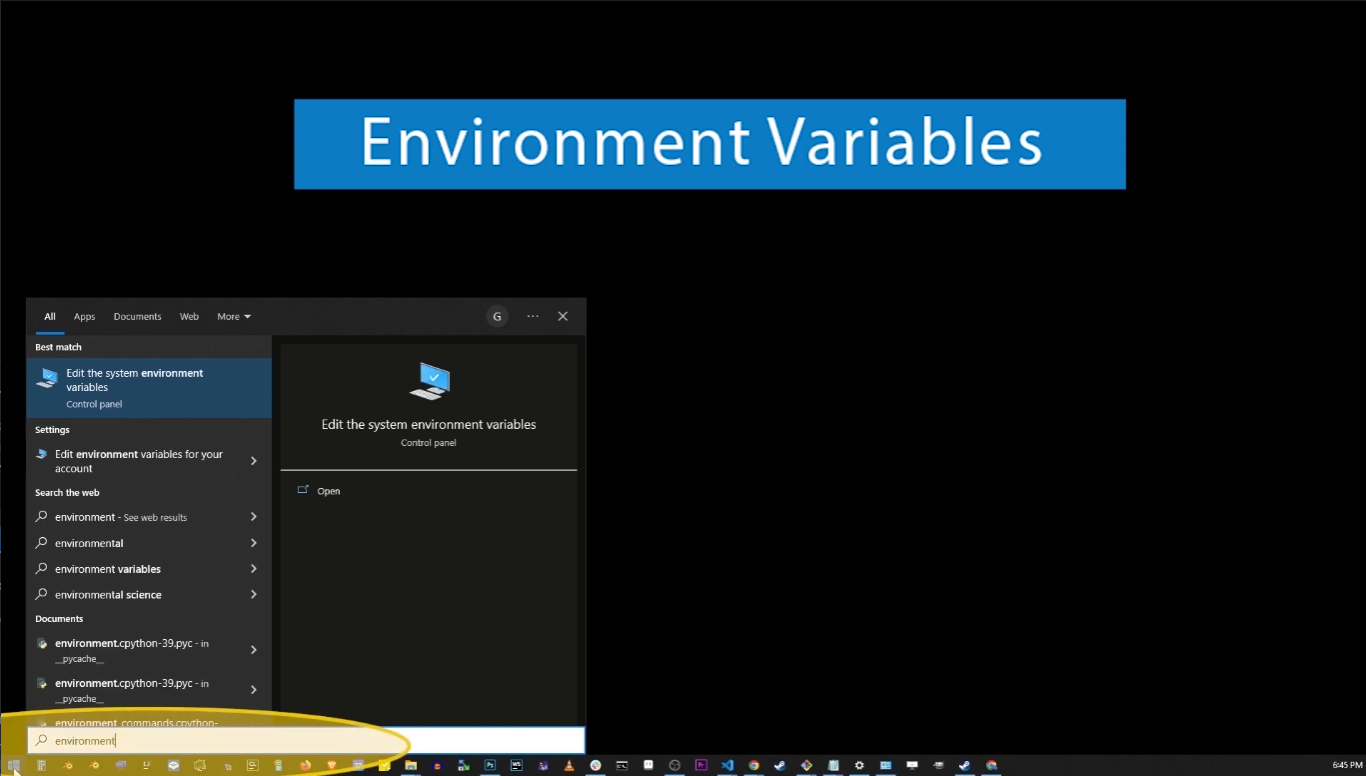
Go to Start button and type "Environment Variables"
Press Enter and on next screen, follow these steps:

How to find "Environment Variables" and change PATH variable
Just to round up, in order to add C:\nodejs to PATH variable follow these steps:
- Click on Start button and just start typing "environment variables"
- Hit enter and on next screen click "Environment Variables" button
- On next window go to second box below ("System Variables") and locate PATH variable
- Click on PATH variable to select it, and click "Edit..." button
- Click "Add" button and type C:\nodejs (or location where you actually installed Node)
- Click Ok button on each window as they close to confirm changes.
- That's it! You've just added NodeJS installation folder to PATH
With NodeJS installed, and added to Environment Variables, let's move forward.
Step 2: Install React Native's CLI
Here are the steps to set up React Native for running in Android Studio on Windows.
Install the React Native command line interface (CLI)
Open a terminal window and run the following command to install the React Native CLI:
npm install -g react-native-cli
This will enable us to start using react-native command from now on.
Step 3: Install Android Studio
We need Android Studio installed on your machine, you can download it from the official website (Android Studio). Follow the instructions to install Android Studio and set up an emulator.
Step 4: Create a new React Native project
Open a terminal window and navigate to the location where you want to create your project. Then run the following command to create a new React Native project:
react-native init MyProject
Replace "MyProject" with the name you want to give to your project. This will create a new folder with the same name as your project, containing all the files needed to run a React Native app.
Step 5: Open the project in Android Studio
Open Android Studio and click on "Open an existing Android Studio project" in the welcome screen.
Navigate to the folder where you created your project and select the "android" folder inside it.
This will open the project in Android Studio.
Step 6: Run React Native app in Android Studio
In Android Studio, click on the "Run" button in the toolbar to build and run the app.
Select the emulator that you want to run the app on, and click on "OK" to start the app.
How Does React Native Run Your Application?
When you run a React Native application, the following steps occur:
- React Native initializes and sets up the application's execution environment.
- The main function is called, creates root component and initiates render process.
- The render process creates a tree of components that represents app's user interface.
- A native view is created for each component in the tree, and all of them are then added to the native view hierarchy.
- It then listens for user input and updates the component tree as necessary.
- The native views are updated in the view hierarchy based on the updated component tree.
In short, when you run a React Native application, the React Native framework handles the initialization, rendering, and user input processing for the application.
It uses the JavaScript runtime and the underlying native platform's view hierarchy to build and display the user interface on the screen.
Do I have to use emulators from Android Studio?
Android Studio includes a built-in emulator that you can use to test your app. You can create virtual devices for different Android versions and screen sizes, and you can also simulate various hardware features such as GPS, camera, and microphone.
In addition to the built-in emulator, there are several other Android emulators available that you can use with Android Studio. Here is a list of some popular options:
- Genymotion: This is a commercial emulator that is popular among developers because of its fast performance and wide range of features.
- BlueStacks: This is a popular emulator that allows you to run Android apps on your PC. It is free to use, but there is also a premium version with additional features.
- Nox: This is another popular emulator that is available for free. It is known for its stability and compatibility with a wide range of games and apps.
- MEmu: This is a free emulator that is designed specifically for gaming. It supports multiple instances, so you can run multiple apps or games at the same time.
- LDPlayer: This is a free emulator that is optimized for gaming and has a clean, user-friendly interface.
- Andy: This is a free emulator that is designed to be easy to use and has a wide range of features.
- Remix OS Player: This is a free emulator that allows you to run Android apps on your PC. It is based on the Android-x86 project and has a clean, user-friendly interface.
These are just a few examples of the many Android emulators available. It's worth considering trying out a few different ones to find the one that works best for your needs.
Keywords you might be entering to find this video
- how to run a react native app in android studio
- run react native app in visual studio code
- how to run react native project in visual studio code
- how to run react native app in visual studio code mac
- how to run react native app from visual studio code
- command to run react native app in visual studio code
- how to run react native code in visual studio code
- how to install react native in visual studio code
- how to run react native app in visual studio
- how to run react native app in visual studio code
- how to run emulator in visual studio code react native
- how to run react native program in visual studio code
- how to run react native app in visual studio code on windows
- how to use react native in visual studio code
